User Guide (Enhanced Comprehensive)
TL;DR: Deterministic comprehensive guide assembled from all mirrored source markdown files.
- User Guide (Enhanced Comprehensive)
- Source Files
- Collecting Results List Kpi
- Executing Workload Cmake
- Executing Workload Ctest
- Executing Workload Terraform Options
- Executing Workload Testcase
- Preparing Infrastructure Setup Ai
- Preparing Infrastructure Setup Auth
- Preparing Infrastructure Setup Bios
- Preparing Infrastructure Setup Cdn
- Preparing Infrastructure Setup Containerd
- Preparing Infrastructure Setup Dataset
- Preparing Infrastructure Setup Disk Avail
- Preparing Infrastructure Setup Dlb
- Preparing Infrastructure Setup Docker
- Preparing Infrastructure Setup Hugepage
- Preparing Infrastructure Setup Hyperv
- Preparing Infrastructure Setup Kubernetes
- Preparing Infrastructure Setup Kvm
- Preparing Infrastructure Setup Memory
- Preparing Infrastructure Setup Module
- Preparing Infrastructure Setup Network
- Preparing Infrastructure Setup Nfd
- Intel Device Plugins
- Benefits of Completing WL's With NFD Based Labels Accompanying Intel Device Plugins
- Verify Node Feature Discovery
- Verify Intel QAT Device Plugin
- Verify Intel SGX Device Plugin
- Verify Intel DLB Device Plugin
- Verify Intel DSA Device Plugin
- Ensure Intel Device Plugins Are Working After Deployment
- Preparing Infrastructure Setup Nginx Cache
- Preparing Infrastructure Setup Qat In Tree
- Preparing Infrastructure Setup Terraform
- Preparing Infrastructure Setup Wsf
Source Files
- doc/user-guide/collecting-results/list-kpi.md
- doc/user-guide/executing-workload/cmake.md
- doc/user-guide/executing-workload/ctest.md
- doc/user-guide/executing-workload/terraform-options.md
- doc/user-guide/executing-workload/testcase.md
- doc/user-guide/preparing-infrastructure/setup-ai.md
- doc/user-guide/preparing-infrastructure/setup-auth.md
- doc/user-guide/preparing-infrastructure/setup-bios.md
- doc/user-guide/preparing-infrastructure/setup-cdn.md
- doc/user-guide/preparing-infrastructure/setup-containerd.md
- doc/user-guide/preparing-infrastructure/setup-dataset.md
- doc/user-guide/preparing-infrastructure/setup-disk-avail.md
- doc/user-guide/preparing-infrastructure/setup-dlb.md
- doc/user-guide/preparing-infrastructure/setup-docker.md
- doc/user-guide/preparing-infrastructure/setup-hugepage.md
- doc/user-guide/preparing-infrastructure/setup-hyperv.md
- doc/user-guide/preparing-infrastructure/setup-kubernetes.md
- doc/user-guide/preparing-infrastructure/setup-kvm.md
- doc/user-guide/preparing-infrastructure/setup-memory.md
- doc/user-guide/preparing-infrastructure/setup-module.md
- doc/user-guide/preparing-infrastructure/setup-network.md
- doc/user-guide/preparing-infrastructure/setup-nfd.md
- doc/user-guide/preparing-infrastructure/setup-nginx-cache.md
- doc/user-guide/preparing-infrastructure/setup-qat-in-tree.md
- doc/user-guide/preparing-infrastructure/setup-terraform.md
- doc/user-guide/preparing-infrastructure/setup-wsf.md
Collecting Results List Kpi
Source: doc/user-guide/collecting-results/list-kpi.md
list-kpi.sh is used to display KPI results of a workload execution by scanning ctest log files.
Execute this command in the workload folder to fetch KPIs:
Options for list-kpi.sh
Usage: [options] [logs-directory]
--primary             List only the primary KPI.
--all                 List all KPIs.
--params              List workload configurations.
--sutinfo             List sutinfo information.
--format list|xls-list
                      Specify the output format.
--file <filename>     Specify the spread sheet filename.
--uri                 Show the WSF portal URI if present.
--intel_publish       Publish to the WSF dashboard.
--export-trace        Re-run the trace export routines.
--owner <name>        Set the publisher owner.
--tags <tags>         Set the publisher tags.
--recent              List KPIs for recent testcases.
Executing Workload Cmake
Source: doc/user-guide/executing-workload/cmake.md
This will help to generate native build tool that uses platform independent configuration
files to generate native build tool files. You can execute inside build directory.
Build examples
Customize the Build Process
You can use the following build options to customize the build process:
- PLATFORM: Specify the platform names. See
platformsfor the list of platforms. - REGISTRY: Must end with forward slash (
/). Specify the privacy docker registry URL. If specified, all built images will be pushed to given docker registry. - REGISTRY_AUTH: Specify the registry authentication method. The only supported value is
docker, which uses the docker configuration file. - RELEASE: Must begin with colon (
:). Specify the release version. All built images will be tagged with it. Defaults to:latest - BACKEND: Specify the validation backend:
docker,kubernetes, orterraform. - TERRAFORM_OPTIONS: Specify the
terraformoptions. - TERRAFORM_SUT: Specify the target System Under Test (SUT) list.
- TIMEOUT: Specify the validation timeout, which contains the execution timeout and docker pull timeout. Default to 28800,300 seconds.
- BENCHMARK: Specify a workload pattern. Workloads not matching the pattern will be disabled. The workload pattern is in the format of
<workload-path>/<workload-sub-target>, where<workload-path>is the workload path relative to the project root, and<workload-sub-target>is any sub-component defined in the workload. For example, some workload defines multiple versions thus have multiple builds and testcase targets. - SPOT_INSTANCE: If specified, overwrite the
spot_instancevariable in the Cloud configuration files.
cmake -DBENCHMARK=workload/SpecCpu-2017 ..  # all build targets of SpecCpu-2017
cmake -DBENCHMARK=workload/SpecCpu-2017/speccpu_2017_v119_gcc13_ubuntu24 .. # specific build target of SpecCpu-2017
Command Make Targets
- bom: Print out the BOM list of each workload.
- clean: Purge the
logs.
See Also
Executing Workload Ctest
Source: doc/user-guide/executing-workload/ctest.md
Use ./ctest.sh to run a single test or batch of tests. You can do this at the top-level build directory or under each workload directory. In the latter case, only the tests of the workload will be executed.
CTest Options
There is an extensive list of options in ./ctest.sh to control how tests can be executed. The followings are most common options which are inherited from ctest. See man ctest for all inherited ctest options. The ./ctest.sh extensions are listed below.
-R: Select tests based on a regular expression string.-E: Exclude tests based on a regular expression string.-V: Show test execution with details.-N: List test vectors only.
Example: list tests with boringssl in name excluding those with _gated
Example: run only test_static_boringssl (exact match)
Customize Configurations
It is possible to specify a test configuration file to overwrite any configuration parameter of a test case:
The configuration file uses the following format:
where *_dummy_pi specifies the test case name. You can use * to specify a wildcard match. The subsection underneath specifies the configuration variables and values. Any parameters specified in each test case validate.sh can be overwritten.
Use with caution as overwriting configuration parameters may lead to invalid parameter combinations.
Benchmark Scripts
A set of utility scripts are linked under your workload build directory to make it easy for workload benchmark activities.
ctest.sh
ctest.sh: This is an extended ctest script extending the following features, besides what ctest supports:
Usage: [options]
--nohup          Run the test case(s) in the daemon mode for long benchmark
--daemon         Run the test case(s) with daemonize for long benchmark with cleaning of environments before workload execution.
--noenv          Clean any external environment variables before proceeding with the tests.
--loop           Run the benchmark multiple times sequentially.
--run            Run the benchmark multiple times on the same SUT(s).
--burst          Run the benchmark multiple times simultaneously.
--config         Specify the test-config file.
--options        Specify additional validation backend options.
--set            Set the workload parameter values during loop and burst iterations.
--stop [prefix]  Kill all ctest sessions without prefix or kill specified session with prefix input as workload benchmark namespace name.
--continue       Ignore any errors and continue the loop and burst iterations.
--prepare-sut    Prepare cloud SUT instances for reuse.
--reuse-sut      Reuse previously prepared cloud SUT instances.
--cleanup-sut    Cleanup cloud SUT instances.
--dry-run        Generate the testcase configurations and then exit.
--testcase       Specify the exact testcase name to be executed.
--attach <file>  Specify a file to be attached under the logs directory.
--check-docker-image             Check image availability before running the workload.
--push-docker-image <registry>   Push the workload image(s) to the mirror registry.
--testset                        Specify a testset yaml file.
--describe-params                Show workload parameter descriptions.
Examples
-
Run
awstest cases5times sequentially (loop): -
Run
awstest cases5times simultaneously (burst): -
Run
awstest cases4times simultaneously with theSCALEvalue incremented linearly as1000,1300,1600,1900in each iteration:...uses three previous values to deduce the increment -
Run
awstest cases4times simultaneously with theSCALEvalue incremented linearly as1000,1600,1000,1600in each iteration:...uses three previous values to deduce the increment|200means the values must be divisible by 200 -
Run
awstest cases4times simultaneously with theSCALEvalue incremented linearly as1000,1600,2000,1000in each iteration:...uses three previous values to deduce the increment8000|means the values must be a factor of 8000 -
Run
awstest cases4times simultaneously with theSCALEvalue incremented exponentially as1000,2000,4000,8000in each iteration:...uses three previous values to deduce the multiplication factor -
Run
awstest cases6times simultaneously with theSCALEvalue enumerated repeatedly as1000,1500,1700,1000,1500,1700in each iteration: -
Run
awstest cases6times simultaneously with theSCALEandBATCH_SIZEvalues enumerated separately as (1000,1), (1500,2), (1700,4), (1000,8) in each iteration:Values are repeated if needed.
-
Run
awstest cases8times simultaneously with theSCALEandBATCH_SIZEvalues permutated as (1000,1), (1000,2), (1000,4), (1000,8), (1500,1), (1500,2), (1500,4), (1500,8) in each iteration: -
For cloud instances, it is possible to test different machine types by enumerating the
<CSP>_MACHINE_TYPEvalues (<CSP>is Cloud Service Provider's abbreviation, e.g.AWS_MACHINE_TYPEorGCP_MACHINE_TYPE): -
For
awswith specified:- type of disk
- size of disk
- disk's IOPS
- number of striped disks
Cloud SUT Reuse
It is possible to reuse the Cloud SUT instances during the benchmark process. This is especially useful in tuning parameters for any workload.
To reuse any SUT instances, you need to first prepare (provision) the Cloud instances, using the ctest.sh --prepare-sut command as follows:
The --prepare-sut command provisions and prepares the Cloud instances suitable for running the aws_kafka_3n_pkm test case. The preparation includes installing docker/Kubernetes and labeling the worker nodes. The SUT details are stored under the sut-logs-aws_kafka_3n_pkm directory.
Next, you can run any iterations of the test cases, reusing the prepared SUT instances with the --reuse-sut command, as follows:
If
--reuse-sutis set,--burstis disabled.
Finally, to cleanup the SUT instances, use the --cleanup-sut command:
SUT reuse is subject to the following limitations:
- The SUT instances are provisioned and prepared for a specific test case. Different test cases cannot share SUT instances.
- It is possible to change workload parameters, provided that such changes do not:
- The changes do not affect the worker node numbers.
- The changes do not affect the worker node machine types, disk storage, or network topologies.
- The changes do not affect worker node labeling.
- The changes do not introduce any new container images.
After using the Cloud instances, please clean them up.
Running Testcases using Testset YAML
You can specify a testset configuration file to sequentially run a few test cases with ctest.sh:
PLATFORM: SPR
BENCHMARK: dummy
TERRAFORM_OPTIONS: "--docker"
TERRAFORM_SUT: kvm
testcase: "test_kvm_dummy_pi_pkm"
options: "--sutinfo --intel_publish"
#test-config: "test-config.yaml"
SCALE: 2000

---

PLATFORM: ICX
BENCHMARK: dummy
TERRAFORM_OPTIONS: "--docker"
TERRAFORM_SUT: kvm
testcase: "test_kvm_dummy_pi_pkm"
options: "--sutinfo --intel_publish"
#test-config: "test-config.yaml"
SCALE: 2000
where two testcases are executed:
- Supported cmake options: PLATFORM, BENCHMARK, REGISTERY, REGISTRY_AUTH, TIMEOUT, SPOT_INSTANCE, TERRAFORM_OPTIONS, and TERRAFORM_SUT.
- Supported ctest options: testcase, test-config, config, loop, burst, run, and options.
- testcase and options can be either a string or a list of strings.
- If testcase starts with and ends with /, the testcase name is a regular expression. If testcase starts with !/ and ends with /, the testcase name is an anti regular expression. Otherwise, the testcase name is the exact name.
- Any other specified parameters are passed to ctest.sh via --set.
Executing Workload Terraform Options
Source: doc/user-guide/executing-workload/terraform-options.md
The Terraform validation backend runs any testcases in stages.
Stages
flowchart LR;
  provision{{Provision VMs}};;
  setup{{Setup VMs}};;
  exec{{Workload Execution}};;
  cleanup{{Restore/Cleanup}};;
  provision --> setup --> exec --> cleanup;;
CSP Provisioning: Terraform scripts are used to provision any CSP VMs. For on-premises clusters, this step is skipped.VM SetupandWorkload Execution: Ansible scripts are used to install software and execute the workloads.Cleanup: Terraform and ansible scripts are used to restore the VM settings and to destroy the VMs. There is no configuration in this stage.
Terraform Configuration Parameters
You can configure the CSP resources during the terraform VM provisioning stage:
CSP Common Parameters
<CSP>_COMPARTMENT: Specify the compartment id of the Oracle Cloud resources.<CSP>_CUSTOM_TAGS: Specify custom resource tags to be attached to any newly created CSP resources. The value should be a set of comma delimited key=value pairs, i.e.,a=b,c=d,e=f.<CSP>_REGION: Specify the CSP region value. If not specified, the region value will be parsed from the zone value.<CSP>_RESOURCE_GROUP_ID: Specify the resource group id of the Alibaba* Cloud resources.<CSP>_SPOT_INSTANCE: Specify whether to use the CSP spot instance for cost saving. The default value istrue.<CSP>_ZONE: Specify the CSP availability zone. The zone value must be prefixed with the region string.
VM Work Group Parameters
<CSP>_<workgroup>_CPU_CORE_COUNT: Specify the visible CPU core number.<CSP>_<workgroup>_CPU_MODEL_REGEX: Specify a regular expression pattern that the SUT cpu model must match. The SUT instance will be replaced if there is a mismatch.<CSP>_<workgroup>_INSTANCE_TYPE: Specify workgroup instance type. The instance type is CSP specific.<CSP>_<workgroup>_MEMORY_SIZE: Specify the memory size in GB.<CSP>_<workgroup>_MIN_CPU_PLATFORM: Specify the minimum CPU platform value for Google* Cloud compute instances. Replace any whitespace with%20. For example, useIntel%20Ice%20Laketo specify a minimum platform ofIntel Ice Lake.See GCP for possible values.
<CSP>_<workgroup>_NIC_TYPE: Specify the Google Cloud NIC type. Possible values:GVNICorVIRTIO_NET. The default isGVNIC.<CSP>_<workgroup>_OS_DISK_IOPS: Specify the OS disk I/O performance numbers in I/O per second.<CSP>_<workgroup>_OS_DISK_SIZE: Specify the OS disk size in GB.<CSP>_<workgroup>_OS_DISK_THROUGHPUT: Specify the I/O throughput in MB/s.<CSP>_<workgroup>_OS_DISK_TYPE: Specify the OS disk type.<CSP>_<workgroup>_OS_IMAGE: Specify the OS virtual machine custom image. If specified, the value will voidOS_TYPEandOS_DISKvalues.<CSP>_<workgroup>_OS_TYPE: Specify the OS type. Possible values:ubuntu2004,ubuntu2204, ordebian11. Note thatdebian11may not work on all CSPs.
where<workgroupcan be any ofworker,client, andcontroller.<CSP>_<workgroup>_THERADS_PER_CORE: Specify the thread number per CPU core.
Data Disks Parameters
<CSP>_DISK_SPEC_<n>_DISK_COUNT: Specify the number of data disks to be mounted.<CSP>_DISK_SPEC_<n>_DISK_FORMAT: Specify the data disk format as part of thedisk_spec_<n>definition. The value depends on the OS image.ext4is a common format.<CSP>_DISK_SPEC_<n>_DISK_SIZE: Specify the data disk size in GB as part of thedisk_spec_<n>definition.<CSP>_DISK_SPEC_<n>_DISK_TYPE: Specify the data disk type as per CSP definition. Use the valuelocalto use the instance local storage.<CSP>_DISK_SPEC_<n>_DISK_IOPS: Specify the IOPS value of the data disks.<CSP>_DISK_SPEC_<n>_DISK_PERFORMANCE: Specify the AliCloud performance level of the data disks.See
AliCloud.<CSP>_DISK_SPEC_<n>_DISK_THROUGHPUT: Specify the I/O throughput value of the data disks.See
Azure.
Ansible Configuration Parameters
You can further configure the test parameters during the test execution as follows:
- Use
cmake -DTERRAFORM_OPTIONS=to define the TERRAFORM_OPTIONS options.
- Use
./ctest.sh --options=to add extra configurations toTERRAFORM_OPTIONS.
Common Parameters
docker_auth_reuse: Copy the docker authentication information to SUTs.nosvrinfo/svrinfo: Disable/enable svrinfo SUT information detection.svrinfo_options: Specify svrinfo options. Replace any whitespace in options with%20. The default is''(no options).nomsrinfo/msrinfo: Disable/enable msrinfo SUT information detection.run_stage_iterations: Specify the number of iterations to repeat the workload exuections. The default is1.skopeo_insecure_registries: Specify a list of insecure docker registries (comma delimited). Any access to the registries will usehttp.skopeo_sut_accessible_registries: Specify a list of docker registries (comma delimited) that SUT can directly access to. The workload images are not copied to the SUT assuming the SUT can directly pull the images.terraform_delay: Specify the CSP provisioning retry delay in seconds, if any provision step failed. Default 10 seconds ifterraform applyfailed, or 0s if cpu model mismatched.terraform_retries: Specify the retry times if cpu model mismatched. Default:10.wl_debug_timeout: Specify the debug breakpoint timeout value in seconds. The default is 3600.
SUT Parameters
sut_default_hugepagesz: When any hugepage is set, configure if the default hugepage size should be set. The default isfalse.sut_kernel_args: Specify the list of additional kernel args to be applied on the SUT. The format is<group>:key=value[ key=value][,<group>:key=value...], wheregroupis the SUT work group andkey=valueis the kernel arguments.sut_kernel_modules: Specify additional kernel modules to be installed on the SUT. The format is<group>:module1 [module2...][,<group>:module...], wheregroupis the SUT work group.sut_reboot: Specify whether the SUT is allowed to be rebooted. The default istrue.sut_sudo: Specify whether the SUT is allowed to use sudo. The default istrue.sut_sysctl_options: Specify additional sysctl options to be set on the SUT. The format is<group>:key=value[ key=value][,<group>:key=value...], wheregroupis the SUT work group andkey=valueis the sysctl setting.sut_sysfs_options: Specify additional sysfs options to be set on the SUT. The format is<group>:key=value[ key=value][,<group>:key=value...], wheregroupis the SUT work group andkey=valueis the sysfs seting.
Containerd Parameters
containerd_data_root: Specify thecontainerddata root directory. The default is/var/lib/containerd.containerd_pause_registry: Specify thecontainerdpause image registry prefix. The default isregistry.k8s.io.containerd_version: Specify the containerd version. The default isUbuntu:1.6.15,CentOS:1.6.10, orDebian:1.6.15.containerd_reset: Reset and reinstall containerd. The default isfalse.containerd_insecure_registry: Specify the list of insecure registries, separated with comma.
Docker Parameters
compose: Enable workload docker-compose execution.docker: Enable workload docker execution.docker_compose_plugin_version: Specify the docker compose plugin version. The default is2.18.1.docker_data_root: Specify the docker daemon data root directory. The default is/var/lib/docker.docker_dist_repo: Specify the docker repository URL. The default ishttps://download.docker.com.docker_version: Specify the docker version. The default is20.10.23.native: Enable workload native execution over docker image.
Kubernetes Parameters
k8s_cni: Specify the Kubernetes CNI. The default isflannel.k8s_apiserver_ip: Specify the kubernetes api server ip. The default is controller'sprivate_ipof terraform applied outputs.k8s_apiserver_port: Specify the kubernetes api server port. The default is6443.k8s_calico_encapsulation: Specify the Calico CNI overlay networking. The default isVXLAN.k8s_calico_version: Specify the Calico CNI version. The default isv3.25.k8s_calico_mtu: Specify the Specify MTU, value can be1500or9000. Default is1500.k8s_calicoctl_version: Specify the Calico CNI operator version. The default isv3.25.k8s_calicovpp_version: Specify the Calicovpp operator version. THe default isv3.25.k8s_calicovpp_buffer_data_size: Specify Calico-vpp data-size buffer in Calicovpp configuration. The default is2048.k8s_calicovpp_cores: Specify how many CPU cores will be used for the l3fwd and calicovpp pod, respectively. Default is1.k8s_calicovpp_dsa_enable: Specify testing mode, value can betrue,falsefor DSA memif, SW memif testing. Default istrue.k8s_delete_namespace_timeout: Specify the timeout value when deleting the Kubernetes namespace. The default is10m(10 minutes).k8s_enable_registry: Install a docker registry within the Kubernetes cluster to serve the workers. The workload images are copied to the docker registry. The default value istrue.k8s_flannel_version: Specify the flannel CNI version. The default isv0.21.5.k8s_istio_install_dist_repo: Specify the istio distribution repository. The default ishttps://istio.io/downloadIstio.k8s_istio_version: Specify the istio version. The default is1.15.3.k8s_nfd_registry: Specify the NFD image repository. The default isk8s.gcr.io/nfd.k8s_nfd_version: Specify the NFD version. The default isv0.13.2.k8s_pod_cidr: Specify the kubernetes pod subnet. The default is10.244.0.0/16.k8s_registry_port: Specify the in-cluster registry port. The default is20668.k8s_install: If True, force Kubernetes installation playbook to be run. Default False. Images for upload should be defined usingwl_docker_imagesinvalidate.shand passed as a string with,separator usingTERRAFORM_OPTIONS.
Example:
TERRAFORM_OPTIONS="${TERRAFORM_OPTIONS} --wl_docker_images=${REGISTRY}image-name-1${RELEASE},${REGISTRY}image-name-2${RELEASE}"
k8s_reset: Reset Kubernetes, if detected, and reinstall Kubernetes. The default isfalse.k8s_service_cidr: Specify the kubernetes service subnet. The default is10.96.0.0/12.k8s_version: Specify the Kubernetes version. The default is1.26.6.k8s_plugins: Specify a list of additonal Kubernetes devices plugins, supported options are nfd. The default is None.
Trace Module Parameters
collectd: Enable the collectd tracer.collectd_interval: Specify the collectd sample time interval. The default is 10 seconds.emon: Enable the emon tracer.emon_post_processing: Specify whether to enable/disable Emon post-processing. The default istrue.emon_view: There are 3 optional views to be selected--socket-view--core-view--thread-viewyou can select one or more of them or use--no-detail-viewsto just generate the summary by default system/core/thread views are generated. Replace any white space in options with%20. The default is--socket-view%20--core-view%20--thread-view; also can useemon_view=""to just generate the summary by system.gprofiler: Enable the gprofiler tracer.gprofiler_image: Specify the gprofiler docker image. The default isdocker.io/granulate/gprofiler.gprofiler_options: Specify the gprofiler options. Replace any white space in options with%20. The default is--profiling-frequency=11%20--profiling-duration=2.gprofiler_version: Specify the gprofiler version. The default islatest.perf: Enable the perf tracer.perf_action: Specify the perf action. The default isrecord.perf_collection_time: Specify the perf record time. The default isinfinity.perf_fetch_data: Specify whether to retrieve the raw perf record data back to the logs directory. The default isfalse.perf_flamegraph: Specify whether to generate flamegraph during post-processing. The default isfalse.perf_flamegraph_collapse_options: Specify the flamegraph collapse command options. Replace any whitespace in options with%20. The default is--all.perf_flamegraph_svg_options: Specify the flamegraph generation options. Replace any whitespace in options with%20. The default is--color=java%20--hash.perf_record_options: Specify the perf record command options. Replace any whitespace in options with%20. The default is-a%20-g.perf_stat_options: Specify the perf record command options. Replace any whitespace in options with%20. The default is-a%20-I%20500%20-e%20cycles%20-e%20instructions.perf_script_options: Specify the perf script command options. Replace any whitespace in options with%20. The default is `` (no options).sar: Enable the sar tracer.sar_options: Specify the sar command line options. Replace any whitespace in options with%20. The default is-B%20-b%20-d%20-p%20-H%20-I%20ALL%20-m%20ALL%20-n%20ALL%20-q%20-r%20-u%20ALL%20-P%20ALL%20-v%20-W%20-w%205.
Instance Watch Parameters
The instance watch feature monitors a SUT instance uptime and CPU utilization. Best for managing Cloud VM instances. If the uptime of the SUT instance exceeds a threshold and then the CPU load is consequtively measured to be low, the instance will be automatically shutdown (powered off).
instance_watch: Enable/disable instance watch. The default isfalse.instance_watch_cpu_load: Specify the CPU load in percentage. The instance is considered low utilization if the load is below the threashold. The default is10.instance_watch_cpu_load_count: Specify the number of times that the CPU load must be consequtively below the threshold before considering the CPU as low utilized. The default is3.instance_watch_cpu_load_span: Specify the time between two CPU load measures. The default is15s.instance_watch_interval: Specify the instance uptime watch interval. The default is30m.instance_watch_shutdown_postpone: Specify the shutdown postpone time in minutes. The default is30.instance_watch_uptime: Specify the maximum instance uptime in minutes. The default is360, i.e., 6 hours.
Executing Workload Testcase
Source: doc/user-guide/executing-workload/testcase.md
Each workload defines a set of testcases, i.e., typical usage scenarios. Internally, each testcase encapsulates default values of workload configuration parameters. For example, the dummy workload's testcase dummy_pi_pkm calculates pi (π) to the 2000 digits.
Naming patterns
You can list the testcases of a workload as follows:
Testcases typically follow the pattern of test_[<sut>_]<workload>_<testcase>, where <sut> is optional and specific to the validation backend setting. The testcase name should be descriptive for the workload usage conditions.
For example, use _1n to indicate that the workload runs on a single worker node, and _3n to indicate that the workload runs on 3 worker nodes.
Special Test Cases
The following testcase suffixes are reserved:
- _gated: A testcase suffixed with _gated is designed for CI commit validation. The testcase is expected to be a quick test
of the workload software stack. To improve CI efficiency, design the testcase such that the workload completes within 5 minutes.
- _preswa: A testcase suffixed with _preswa is designed for Pre-Si performance analysis. The testcase is expected to run
with reduced complexity such that the workload can complete in a reasonable time in Simics and still represent the main
characteristics of the full workload execution. The workload must define EVENT_TRACE_PARAMS and PRESWA_POI_PARAMS
to enable windowed emon trace collection.
- _pkm: A testcase suffixed with _pkm is designed for Post-Si performance analysis. The testcase is expected to represent
the common use case of the workload. If the _pkm testcase runs relatively long (say, more than 10 minutes), the workload must
define EVENT_TRACE_PARAMS to enable windowed emon trace collection. Compared with _preswa, there is no
complexity restriction in _pkm. Each workload should have at least 1 _pkm testcase and no more than 2 _pkm testcases.
- _pdt, _pnp: A testcase suffixed with _pnp or _pdt indicates that the test case contains recipes and configurations that have been approved by either the Performance PDT or the PNPJet forum. The software recipe versions
and the workload configurations are frozen. This is designed for the users to repeat any previously approved performance data.
Testcase Configurations
To improve usability, define the configuration parameters of a testcase such that the workload can run on any typical platforms.
Here the typical platform is defined as being the AWS xlarge instance equivalent, which includes 4 virtual cores and 16GB of memory.
If a workload must use more cores or memory, the workload must declare the minimum platform requirement in cluster-config.yaml.m4
and README.md.
In addition to the testcases defined in CMakeLists.txt, a workload may define additional testcase configuration
files to customize the testcase parameters for reproducing performance data in the workload performance report.
The testcase configuration files use the following convention: test-config-<sut|arch>[-<identifier>].yaml, where:
- <sut|arch> defines the target platform. For Cloud instances, <sut> is usually the Cloud provider name, matching one of the validation backend configurations,
for example, aws will be matched against terraform-config.aws.tf. For On-Premises platforms, <sut> specifies
the platform architecture, for example, icx or spr.
- <identifier> is an optional string to describe the purpose of the testcase overwrite, if there are multiple testcase configurations.
The testcase configuration for below mentioned file overwrites the dummy workload testcases:
# test-config-aws.yaml
# Overwrite the test cases for performance tunning on AWS instances.

*_pi_pass:
    SCALE: 5000
    AWS_MACHINE_TYPE: m6i.x4large

*_pi_fail:
    SCALE: 5000
    AWS_MACHINE_TYPE: m6i.x4large
Please note that it is important to include the Cloud instance type as part of the overwrite to completely describe the running environment.
Things become complicated when it comes to define an On-Premises platform setup. Please describe the complete setup as comments at the top of the configuration file.
Preparing Infrastructure Setup Ai
Source: doc/user-guide/preparing-infrastructure/setup-ai.md
Overview
This document is a guide for using AI workload.
AI Workload Naming
AI workload naming following this format: \<Model Name>-\<Framework>-[Platform][-Additions] e.g. "3DUNet-OpenVINO-MLPerf". [Platform] will be ignored if Platform="Xeon".
- Model Name: Specify AI deep learning Model Name
- Framework: Specify Framework used:
TensorFlow,PyTorch,OpenVINO(Intel CPU only) orTensorRT(Nvidia GPU only). - Platform: Specify Platform based:
`(empty for Intel Xeon CPU),EPYC(AMD EPYC CPU),ARMv8/ARMv9(AWS Graviton based CPU),Nvidia(Nvidia GPU) orInferentia` (AWS inference accerlator card) - Additions: Specify Additions information for workload
AI Test Case Naming
\<WL name>_inference_throughput_gated
\<WL name>_inference_throughput_pkm
\<WL name>_inference_latency
\<WL name>_inference_accuracy
\<WL name>_training_throuphput
\<WL name>_training_accuracy
Configuration:
AI workload can be run on BareMetal and Cloud VM both. AWS, GCP and Azure cloud have been suggested to use.
Suggested cloud instance type:
Intel ICX:
- AWS cloud: m6i
- GCP cloud: n2-highmem-96
- Azure cloud: Dv5-series
AMD Milan:
- AWS cloud: m6a
- GCP cloud:
- Azure cloud: Dasv5 and Dadsv5-series
AMD Roma:
- AWS cloud: m5a
- GCP cloud:
- Azure cloud: Dav4 and Dasv4-series
AWS Graviton2:
- AWS cloud: m6g
AWS Graviton3:
- AWS cloud: c7g
AWS Inferentia:
- AWS cloud: inf
Nivida GPU:
- AWS cloud: g4dn (T4)
Best Configuration:
-
For ICX platforms based AI workload: Tuning Guide for Deep Learning
-
For SPR platforms based AI workload: Tuning Guide for Deep Learning
Restriction
- N/A
Node Labels
Setup the following node labels for AI workloads:
- HAS-SETUP-BKC-AI=yes: Optional.
KPI output
KPI output example:
#================================================
#Workload Configuration
#================================================
##FRAMEWORK: PyTorch 1.13.0a0+gitd7607bd
##MODEL_NAME: DLRM
##MODEL_SIZE: 89137319
##MODEL_SOURCE: Facebook
##DATASET: Criteo 1TB Click Logs (terabyte)
##FUNCTION: inference
##MODE: throughput
##PRECISION: avx_fp32
##DATA_TYPE: real
##BATCH_SIZE: 1
##STEPS: 1
##INSTANCE_NUMBER: 2
##CORES_PER_INSTANCE: 56
#================================================
#Application Configuration
#================================================
##SCENARIO: offline
##SERVING_STACK: -
##MODEL_WORKERS: -
##REQUEST_PER_WORK: -
#================================================
#Metrics
#================================================
Average Throughput (samples/sec): 27168.18
Max Latency (ms): -1
Min Latency (ms): -1
Mean Latency (ms): 4.33
P50 Latency (ms): -1
P90 Latency (ms): -1
P95 Latency (ms): -1
P99 Latency (ms): -1
P999 Latency (ms): -1
TTT: -1
Samples: -1
Compute Utilization: -1
Memory Utilization: 89.79 GB
FLOPs: -1
Model Quality Metric Name: -1
Model Quality Value: -1
Cost Per Million Inferences: -1
#================================================
#Key KPI
#================================================
*Throughput (samples/sec): 27168.18
NOTE: Make sure gprofiler telemetry data is accurate. You need to use the _pkm case or set a larger STEPS.
Preparing Infrastructure Setup Auth
Source: doc/user-guide/preparing-infrastructure/setup-auth.md
A private docker registry is optional in most of the validation scenarios except if you want to run the workloads on an On-Premises Kubernetes cluster, or you explicitly setup a docker registry to store any newly built workload images.
This document describes how to authenticate to a docker registry if the registry requires authentication. Skip this document if there is no authentication requirement.
REGISTRY_AUTH
The cmake REGISTRY_AUTH option specifies how to authenticate to a private docker registry. Currently, docker and pass are the only supported values, which uses the docker authentication mechanism or docker-credential-pass with pass as password store.
Docker
Enable the REGISTRY_AUTH option:
With the above command, the validation scripts will upload the docker authentication information specified in .docker/config.json as a Kubernetes imagePullSecret to the validation cluster, On-Premises or in Cloud.
CredHelpersorCredStorein.docker/config.jsonis not supported.
Pass
Enable the REGISTRY_AUTH option:
Version for both pass and docker-credential-pass binaries is read automatically. With the above command, the validation scripts will make the pass and gpg session available on execution machine.
Authenticate to Cloud Private Registry
Amazon Elastic Container Registry
make aws
$ aws ecr get-login-password --region <region> | docker login --username AWS --password-stdin <account-id>.dkr.ecr.<region>.amazonaws.com
$ exit
Note that the build script will auto-create the image repository namespaces.
Google Cloud Container Registry
make gcp
$ gcloud auth activate-service-account --key-file <key-file>
$ gcloud auth print-access-token | docker login -u oauth2accesstoken --password-stdin <registry-url>
$ exit
Note that the Oauth2 access token will expire in an hour.
Azure Container Registry:
make azure
$ az acr login --name <registry-name> --expose-token --output tsv --query accessToken | docker login -username 00000000-0000-0000-0000-000000000000 --password-stdin <registry-url>
$ exit
Preparing Infrastructure Setup Bios
Source: doc/user-guide/preparing-infrastructure/setup-bios.md
Introduction
This code provides experimental support to change BIOS settings on SUT machines. The support is based on syscfg for most production systems.
As BIOS update can potential cause irreversible damage, you must explicitly enable the --sut_update_bios option and the --sut_reboot option for any BIOS related operations.
Probe BIOS Versions and Knobs
The BIOS knobs differ by different BIOS versions, which makes it difficult to provide universal BIOS setup. To probe the BIOS version on your SUT systems, do the following:
After running the testcase, the current BIOS setup is saved under the test case logs directory under worker-0-bios/syscfg.ini, where you can obtain the BIOS version and the BIOS knobs.
cluster.bios
As a workload developer, you can configure your workload to mandate certain BIOS settings, such as setting HyperThreading to be Disabled.
Write such configurations in cluster-config.yaml.m4:
- labels: {}
  bios:
    SE5C620.86B:
      "Intel(R) Hyper-Threading Tech": Enabled          # Disabled
      "CPU Power and Performance Policy": Performance   # "Balanced Performance", "Balanced Power", or "Power"
    EGSDCRB1.86B:
      ProcessorHyperThreadingDisable: "ALL LPs"         # "Single LP"
      ProcessorEppProfile: Performance                  # "Balanced Performance", "Balanced Power", or "Power"
SE5C620.86B and EGSDCRB1.86B are BIOS version substrings. If there are multiple matches, the longest match takes precedent (according to descendent string sort.)
The BIOS knobs such as Intel(R) Hyper-Threading Tech and their values Enabled must exactly match the BIOS definitions.
Global Options
You can overwrite any BIOS settings globally as follows:
./ctest.sh -R <testcase> -V --options="--sut_reboot --sut_update_bios --sut_bios_tool=syscfg --sut_bios_options=worker:ProcessorEppProfile=Performance"
--sut_bios_options is a list of BIOS group:key=value string. Use , to separate the list items and %20 to escape any whitespaces.
See Also
syscfg: https://www.intel.com/content/www/us/en/download/765094/server-configuration-utility-syscfg-for-intel-server-boards-and-intel-server-systems.html
Preparing Infrastructure Setup Cdn
Source: doc/user-guide/preparing-infrastructure/setup-cdn.md
This document is a guide for setting up CDN benchmark environment, including Hardware platform and Software configuration on network, storage and QAT.
HW Prerequisites
-
Setup 2 or 3 servers:
-
3-node: one client node; 2 CDN servers: worker-1, worker-2.
- 2-node: one client node; 1 CDN server: worker-1.
- All servers support at least
100Gnetwork bandwidth, e.g. 1x 100G NIC - Connect all servers through a switch with at least
100Gnetwork capacity. - CDN server requires 4 NVMe disks, each has at least
1.8Tsize capacity. And it's better to support PCIe Gen4 x4 width. - Please consider NUMA balance for NVMe drive and NIC setup, this is important for performance tests.
flowchart TD;
  subgraph 3-node;
  subgraph Server_cluster;
  worker_1;
  worker_2;
  end

  100G_switch[[100G_switch]]-.-Client_Node;
  100G_switch[[100G_switch]]-.-worker_1;
  100G_switch[[100G_switch]]-.-worker_2;

  end
flowchart TD;
  subgraph 2-node;
    subgraph Server_cluster;
    worker_1;
    end

  100G_switch[[100G_switch]]-.-Client_Node;
  100G_switch[[100G_switch]]-.-worker_1;
  end
OS configuration
- Install Ubuntu 22.04 server-version or latest version on CDN server.
- Check the NVMe driver and NIC driver are all loaded and setup fine.
- Setup network proxies if needed and append server (e.g. 192.168.2.200) and client (e.g. 192.168.2.100) 100G NIC IP to your
no_proxyon client and server.
K8S Labels configuaration
Please finish the section Network configuration, Storage configuration, or QAT hardware configuration, then label the corresponding nodes.
Command examples:
- Label:
- Unlabel:
CDN server worker-1:
For ICX,
HAS-SETUP-DISK-SPEC-1=yesHAS-SETUP-NIC-100G=yes
For SPR,
HAS-SETUP-DISK-SPEC-1=yesHAS-SETUP-NIC-100G=yesHAS-SETUP-QAT=yesHAS-SETUP-HUGEPAGE-2048kB-4096=yes
CDN server worker-2:
HAS-SETUP-NIC-100G=yes
Network configuration
- Specify 100G IP for servers. These are defined in validate.sh, please pass the real IP as parameters before testing.
| client | worker-1 | worker-2 |
|---|---|---|
| 192.168.2.100 | 192.168.2.200 | 192.168.2.201 |
- modify in
validate.sh -
or pass with
ctest.sh -
Test the network speed after setting up
-
On worker-1
- On client node
Storage configuration
This should be done on worker-1.
-
Prepare cache disk for cache-nginx pod. nvme?n1 means repeat 4 times for 4 disks.
-
Check NVMe drives and Partition drives
-
Create a primary partition
/dev/nvme?n1p1- If disk is lower than 2 TB
- If disk size is higher than 2 TB
-
Change drive attributes
-
Format drives as ext4 (or xfs):
-
Create cache mountpoints and mount to four pairs
-
Add below content into
/etc/fstabto auto-mount after reboot -
Modify storage IO schedule method from default
mq-deadlinetononeon -
Check the partition status
QAT hardware configuration
Set up QAT Hardware for SPR worker-1, please refer to setup-qat-in-tree.
Monitor runtime performance
- Use
sarto monitor runtime network interface performance
- Use
iostatto monitor drive IO performance.
Others
-
Install Intel E810-C CVL Ethernet Adaptor Driver
-
Confirm the NIC model, pls run below command line:
In this environment, Intel 100G E810-C NIC is used for CDN NGINX testing.lspci | grep Eth 17:00.0 Ethernet controller: Intel Corporation Ethernet Controller X710 for 10GBASE-T (rev 02) 17:00.1 Ethernet controller: Intel Corporation Ethernet Controller X710 for 10GBASE-T (rev 02) 4b:00.0 Ethernet controller: Intel Corporation Ethernet Controller E810-C for QSFP (rev 02) 4b:00.1 Ethernet controller: Intel Corporation Ethernet Controller E810-C for QSFP (rev 02) -
Install the kernel development package
To compile the driver on some kernel/arch combinations, you may need to install the kernel development package which has the same version with kernel. you can firstly try to install with:
- Intel E810 series devices Ethernet Adapter Driver Installation - Download the latest E810 series devices firmware update from https://www.intel.com/content/www/us/en/download/19626/non-volatile-memory-nvm-update-utility-for-intel-ethernet-network-adapters-e810-series-linux.html. - Download the latest E810 series devices driver from https://www.intel.com/content/www/us/en/download/19630/intel-network-adapter-driver-for-e810-series-devices-under-linux.html. - Build and install the NIC driver:
Preparing Infrastructure Setup Containerd
Source: doc/user-guide/preparing-infrastructure/setup-containerd.md
Starting Kubernetes v1.20, Kubernetes deprecated docker as a runtime and used containerd instead. It is a prerequisite to install containerd before installing Kubernetes.
Installation
Install containerd from your OS packages:
Setup Proxy
sudo mkdir -p /etc/systemd/system/containerd.service.d
printf "[Service]\nEnvironment=\"HTTP_PROXY=$http_proxy\" \"HTTPS_PROXY=$https_proxy\" \"NO_PROXY=$no_proxy\"\n" | sudo tee /etc/systemd/system/containerd.service.d/proxy.conf
sudo systemctl daemon-reload
sudo systemctl restart containerd
Setup Configuration Files
containerd config default | sudo tee /etc/containerd/config.toml
sed -i 's/SystemdCgroup = .*/SystemdCgroup = true/' /etc/containerd/config.toml
sudo systemctl restart containerd
Setup Insecure Registries
On-Premises workload validation based on Kubernetes requires to use a docker registry. If you need to setup any insecure registries with containerd, modify the containerd configuration as follows, assuming your private registry is foo.com:5000:
sudo sed -i 's|config_path =.*|config_path = "/etc/containerd/certs.d"|' /etc/containerd/config.toml
sudo mkdir -p /etc/containerd/certs.d/foo.com:5000
cat | sudo tee /etc/containerd/certs.d/foo.com:5000/hosts.toml <<EOF
server = "http://foo.com:5000"
[host."http://foo.com:5000"]
  capabilities = ["pull", "resolve"]
[plugin."io.containerd.grpc.v1.cri".registry.configs."foo.com:5000".tls]
  insecure_skip_verify = true
EOF
sudo systemctl restart containerd
On-Premises workload validation based on RKE2 requires to use a docker registry. If you need to setup any insecure registries with containerd, modify the rke2 configuration as follows, assuming your private registry is foo.com:5000:
cat | sudo tee /etc/rancher/rke2/registries.yaml <<EOF
mirrors:
  "foo.com:5000":
    endpoint:
      - "http://foo.com:5000"
EOF
sudo systemctl restart rke2-server
Setup Data Storage
Optionally, if you need to move the containerd storage location to, for example, /mnt/storage/containerd:
sed -i 's|^root =.*|root = "/mnt/storage/containerd"|' /etc/containerd/config.toml
sudo systemctl restart containerd
Preparing Infrastructure Setup Dataset
Source: doc/user-guide/preparing-infrastructure/setup-dataset.md
The dataset labels are used to check if certain dataset is available on the host. Certain dataset are installed automatically if they are missing from the host.
Assume the label is HAS-SETUP-DATASET-BERTLARGE-V2, the dataset is assumed to be available under /opt/dataset/bertlarge/v2.
Preparing Infrastructure Setup Disk Avail
Source: doc/user-guide/preparing-infrastructure/setup-disk-avail.md
The disk-avail labels are used to probe if the workload minimum disk availability threshold is met.
There are three label formats:
HAS-SETUP-DISK-AVAIL-192: This requires that a minimum of 192GB disk availability under either/tmp(native workloads),/var/lib/docker(docker/compose workloads),/var/lib/kubelet(Kubernetes workloads), orC(windows workloads).HAS-SETUP-DISK-AVAIL-192-MNT-DISK1: This requires that a minimum of 192GB disk availability under/mnt/disk1. You can specify any disk path with/replaced with-.HAS-SETUP-DISK-AVAIL-192-D: This requires that a minimum of 192GB disk availability under the drive letterD. This is specific to Windows.
Preparing Infrastructure Setup Dlb
Source: doc/user-guide/preparing-infrastructure/setup-dlb.md
DLB is supported in certain SPR SKUs. Please make sure your CPU sku (QDF) supports DLB.
And DLB is broken with latest BKC kernel 5.15.0-spr.bkc.pc.2.10.0.x86_64.
Before running the workload, please make sure your SPR has DLB device by running the following command:
If there are devices listed, then please download the DLB driver from this link: https://www.intel.com/content/www/us/en/download/686372/intel-dynamic-load-balancer.html
Execute the following commands:
Then you can run the workload on this machine.
Preparing Infrastructure Setup Docker
Source: doc/user-guide/preparing-infrastructure/setup-docker.md
Introduction
The docker validation backend runs any workloads locally on the development host, either through multiple docker sessions or through docker-compose.
Execute a Workload
Switch to the docker validation backend as follows:
Then test any workload as follows:
cmake -DBENCHMARK=dummy ..                      # Select the dummy workload
./ctest.sh -N                                   # List all testcases
./ctest.sh -R _pkm -V                           # Run the _pkm testcase
./list-kpi.sh workload/dummy/logs-dummy_pi_pkm  # Show the KPIs
Setup arm64 Emulation
You can setup the development host as an arm64 emulator. To do so, run the setup.sh script:
See Also
Preparing Infrastructure Setup Hugepage
Source: doc/user-guide/preparing-infrastructure/setup-hugepage.md
Workloads that require to use hugepages must specify a HAS-SETUP-HUGEPAGE label in the format of HAS-SETUP-HUGEPAGE-<size>-<pages>, where <size> is the hugepage size and <pages> is the #pages required. The <size> value must exactly match the string, case sensitive, of the hugepage sizes supported under /sys/kernel/mm/hugepages. For example, to request 1024 pages of 2MB hugepages, use HAS-SETUP-HUGEPAGE-2048kB-1024.
If setting the default hugepage size is required, append -DEFAULTSZ to the label name. For example, HAS-SETUP-HUGEPAGE-2048kB-1024-DEFAULTSZ.
Node Labels
To avoid creating a lot of node labels, it is recommended to specify #pages only in the power 2 values. Label the worker node(s) with the following node labels:
- HAS-SETUP-HUGEPAGE-2048kB-512=yes Optional
- HAS-SETUP-HUGEPAGE-2048kB-1024=yes Optional
- HAS-SETUP-HUGEPAGE-2048kB-2048=yes Optional
- HAS-SETUP-HUGEPAGE-2048kB-4096=yes Optional
System Setup
Hugepage is setup automatically once the labels are in place. If for any reason you need to setup hugepages manually, setup hugepages through the kernel boot parameters, as follows:
Then reboot the machine for the hugepages to take effect.
For Ubuntu, you need to edit sudo vi /etc/default/grub by adding the number of huge pages to GRUB_CMDLINE_LINUX, like this:
Then you need to do sudo update-grub and reboot.
To verify changes you can use this cat /proc/meminfo | grep Huge.
Kubernetes only recognizes hugepages if they are preallocated through boot parameters.
See Also
Preparing Infrastructure Setup Hyperv
Source: doc/user-guide/preparing-infrastructure/setup-hyperv.md
Introduction
This document describes the Hyper-V host setup and how to create Windows/Linux VM images. The VM images can be used as OS images in the terraform backend and the hyperv SUT type.
Setup Hyper-V Host
On the Hyper-V host,
- Turn on the Virtualization option in BIOS on the Hyper-V host.
- If the Hyper-V host is Windows Server 2003, set the IPEnableRouter parameter to 1 in the registry key HKLM\SYSTEM\ControlSet001\Services\Tcpip\Parameters.
- Follow the instructions to enable WinRM (https) on the Hyper-V host. In addition, change the WinRM authentication method to be basic:
Set-WSManInstance WinRM/Config/Service/Auth -ValueSet @{Basic = $true}
Set-WSManInstance WinRM/Config/Service/Auth -ValueSet @{Negotiate = $false}
Set-Item -Path WSMan:\localhost\Service\MaxConcurrentOperationsPerUser -Value 4294967295
Set-Item -Path WSMan:\localhost\Service\MaxConnections -Value 4294967295
- Create a few directories:
C:\Users\Public\Documents\Hyper-V\osimages: Store any pre-downloaded OS images. To save time, you can predownload Windows and Linux OS images into this directory:windows-server-2022-gen1.vhdx: See Prepare Windows OS Image.ubuntu-server-2204.vhdx: See Prepare Linux OS Image.
C:\Users\Public\Documents\Hyper-V\runs: Store any run-time disks and VM instances.C:\Users\Public\Documents\Hyper-V\scripts: Store any run-time powershell scripts.
On the Linux dev machine,
- Modify /etc/environment to add the HyperV host IP address to the no_proxy list. Source /etc/environment for the current ssh session.
- Create a configuration file under script/csp/.hyperv/config.json with content as follows:
Execute Workloads
- Modify
script/terraform/terraform-config.hyperv.tfto specify the Hyper-V host IP address and winrm port. - Configure
TERRAFORM_SUT=hypervto use the hyper-v SUT type.
Trouble Shoot
If you need to login to the VM instances,
- For Linux VM instances, use ./debug.sh to go into the terraform container, and then use ssh -i ssh_access.key -p <port> <user>@<ip> to login to the Linux VM instances, where <port>, <user>, and <ip> are VM instance information available in the inventory.yaml file.
- For Windows VM instances, set a temporary admin password by changing ${password} in script/terraform/template/terraform/hyperv/local/template/cloud-init.windows.tpl. Then you can connect to the Windows VM instances from the Windows HyperV manager. Please restore cloud-init.windows.tpl after trouble shooting.
winrm identify -r:https://127.0.0.1:5986 -auth:basic -u:<user> -p:<passwd> -encoding:utf-8 -skipCAcheck -skipCNcheck
Advanced Topic: Create Custom OS Images
If for any reason, you need to create custom OS images, use the following sections to create Windows/Linux OS Images.
Create Windows VM OS Images
Use the following steps to create Windows OS images:
- Download the Windows Server 2022 iso image from the Microsoft* evaluation center.
- Launch the Windows VM using the Hyper-V manager with the following configurations:
- Use Generation-1.
- Create a disk image
windows-server-2022.vhdxof about 11MB in size. - Create a DVD drive with the content from the Windows Server 2022 iso.
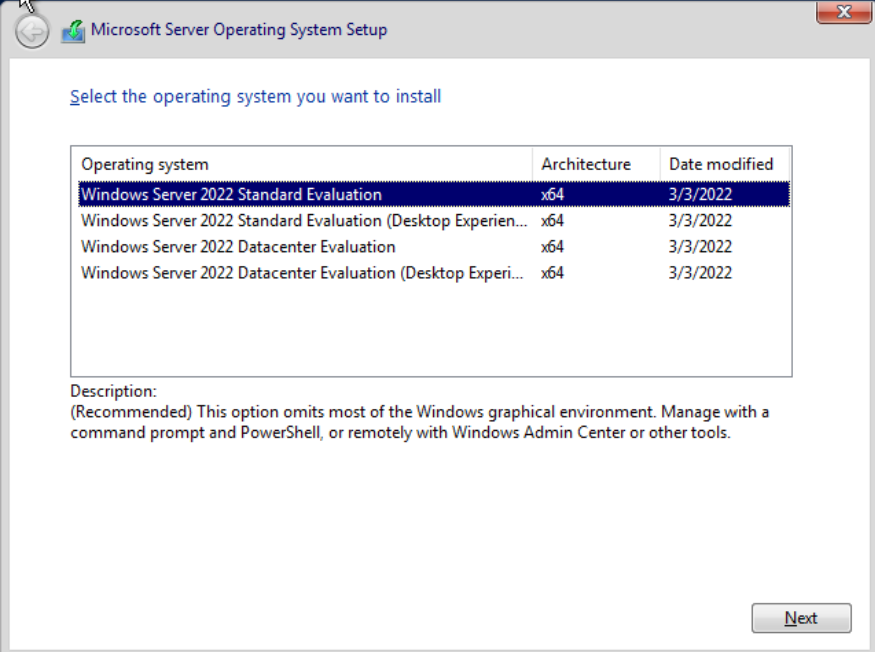
- During the setup, select
Windows Server 2022 Standard Evaluation (Desktop Experience):

- After the OS setup, continue the VM setup:
- Set execution policy unrestricted with powershell:
- Use
diskpartto delete any system recovery partition, and useComputer Management->Disk Managementto expanddisk0to the full extent. This is critical so that the disk can be expanded later to other sizes.
- Download
cloudbase-init:
Invoke-WebRequest -Uri https://github.com/cloudbase/cloudbase-init/releases/download/1.1.4/CloudbaseInitSetup_1_1_4_x64.msi -OutFile CloudbaseInitSetup_1_1_4_x64.msi -Proxy http://proxy-dmz.intel.com:911
- Install
cloudbase-init. During the installation, change the username toAdministratorat this screen, and then clickInstallto installcloudbase-init. Pause to modify a few files in the next step, before proceeding to the final screen.

- Modify
c:\Program Files\Cloudbase Solutions\Cloudbase-init\conf\cloudbase-init-unattended.conf:
metadata_services=cloudbaseinit.metadata.services.nocloudservice.NoCloudConfigDriveService,cloudbaseinit.metadata.services.base.EmptyMetadataService
plugins=cloudbaseinit.plugins.common.sethostname.SetHostNamePlugin,cloudbaseinit.plugins.windows.createuser.CreateUserPlugin,cloudbaseinit.plugins.windows.extendvolumes.ExtendVolumesPlugin,cloudbaseinit.plugins.windows.winrmlistener.ConfigWinRMListenerPlugin,cloudbaseinit.plugins.common.userdata.UserDataPlugin
allow_reboot=true
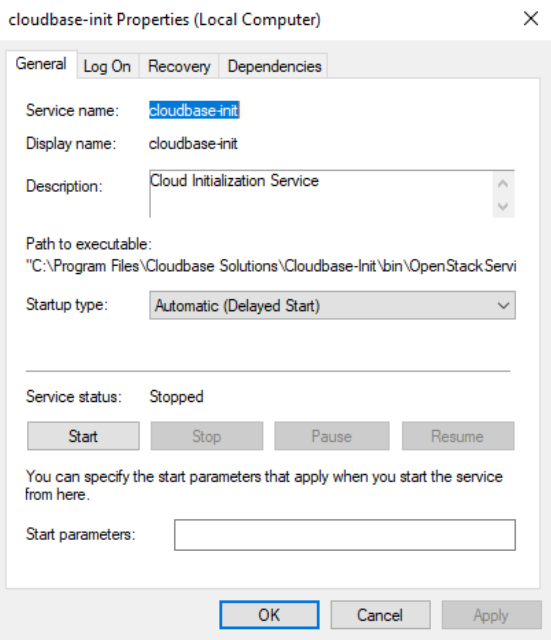
- Fire up
servicesand modify thecloudbase-initservice properties (Startup Type->Delayed Start):
- Modify
c:\Program Files\Cloudbase Solutions\Cloudbase-init\conf\Unattend.xmlas follows:
...
    <RunSynchronousCommand wcm:action="add">
      <Order>1</Order>
      <Path>sc.exe config cloudbase-init start= delayed-auto</Path>
      <Description>Start cloudbase-init</Description>
      <WillReboot>Never</WillReboot>
    </RunSynchronousCommand>
    <RunSynchronousCommand wcm:action="add">
      <Order>2</Order>
      <Path>cmd.exe /c ""C:\Program Files\Cloudbase Solutions\Cloudbase-Init\Python...
      ...
    </RunSynchronousCommand>
...
- Go back to the
cloudbase-initinstallation screen. Select bothsysprepandshutdown, and then clickFinishto complete the installation. Wait untilsysprepis completed and the VM is shutdown.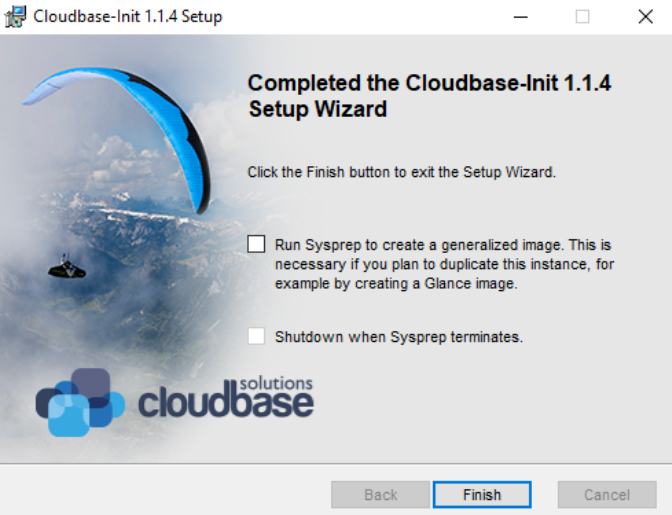
You can now copy your windows-server-2022.vhdx (under c:\Users\Public\Public Documents\Hyper-V\Virtual hard disks) to an antifactory for reuse with HyperV. Do not boot again with this VM image as booting the image may invalidate the cloud-init status, in which case you have to repeat the cloud-init steps.
Setup Linux VM Images
Use the following steps to create Linux VM OS images:
- Linux ISO: Download the Ubuntu Server 2204 ISO image from Ubuntu* Cloud Images.
- Launch the Linux VM using Hyper-V as follows:
- Use Generation-1.
- Create a disk image ubuntu-server-2204.vhdx of about 10GB in size.
- Create a DVD drive with the content from the Ubuntu Server 2204 iso image.
- Select the Ubuntu Server edition during the installation.
- During disk partitioning, de-select LVM to not use the LVM-managed disks. Make sure the root partition is the last partition and occupies the rest of the disk space.
- Select to install the openssh service.
- Create a ubuntu user and set an initial password.
- After the OS setup, continue the VM setup:
- Login to the
ubuntuuser and install the Linux Integration Service.
- Cleanup
cloud-initand shutdown the system:
# nic must have "old" name, eg. eth0 and not ens18
#cat << EOF > /etc/udev/rules.d/70-persistent-net.rules
#SUBSYSTEM=="net", ACTION=="add", DRIVERS=="?*", ATTR{dev_id}=="0x0", ATTR{type}=="1", NAME="eth0"
#EOF

# this prevents network configuration from happening, says so right in the name
#rm -f /etc/cloud/cloud.cfg.d/subiquity-disable-cloudinit-networking.cfg

# ConfigDrive needs to come first (I think)
#cat << EOF > /etc/cloud/cloud.cfg.d/99-pve.cfg
#datasource_list: [ConfigDrive, NoCloud]
#EOF

# this is super important, netplan files are not regenerated if they exist
#sudo rm -f /etc/netplan/00-installer-config.yaml
#sudo rm -f /etc/netplan/50-cloud-init.yaml

sudo cloud-init clean
sudo shutdown -h now
After shutting down, you can copy your linux-server-2204.vhdx (under c:\Users\Public\Documents\Hyper-V\Virtual hard disks) to an antifactory for reuse with Hyper-V. Do not boot again with this VM image as booting the image may invalidate the cloud-init status, in which case you have to repeat the cloud-init steps.
Preparing Infrastructure Setup Kubernetes
Source: doc/user-guide/preparing-infrastructure/setup-kubernetes.md
kubernetes is the default validation backend to run single- or multi-container workloads on a cluster of machines.
Prerequisites
Starting Kubernetes v1.20, Kubernetes deprecated docker as a runtime and used containerd instead. Follow the [instructions][instructions] to install and configure containerd on your system.
Setup Kubernetes
Follow the Ubuntu/CentOS instructions to setup a Kubernetes cluster. For full features, please install Kubernetes v1.21 or later.
You can build the workloads and run the workloads on the same machine by setting up a single-node Kubernetes cluster:
kubectl taint node --all node-role.kubernetes.io/master-
kubectl taint node --all node-role.kubernetes.io/control-plane-  # >= v1.20
Setup Node Feature Discovery (Ansible Automation)
Please refer to the execution role in the location below:
Setup Node Feature Discovery (Manually)
Install node feature discovery as follows:
kubectl apply -k https://github.com/kubernetes-sigs/node-feature-discovery/deployment/overlays/default
See Also
Preparing Infrastructure Setup Kvm
Source: doc/user-guide/preparing-infrastructure/setup-kvm.md
Introduction
A KVM host can serve as many VMs as the KVM host can afford the capacity (CPU, Memory, and Disk). The VMs connect to each other via virtual network and communicate to the Internet via NAT. When a single KVM host is not powerful enough, we need to setup multiple KVM hosts to share the load. This document describes the setup details.
Single KVM Host
The setup-sut-kvm.sh script can be used to setup any KVM host. It is as simple as running the following command:
Then modify script/terraform/terraform-config.kvm.tf to specify the KVM host URL as follows:
...
variable "kvm_hosts" {
  default = [{
    user   = "<user>"
    host   = "<kvm-host-ip>"
    port   = 22
    # DHCP must be enabled on the network interface
    networks = [ "default" ]
    # if specified, os image will reuse the storage pool
    # images (with same image names.)
    pool   = null
  }]
}
pool value can be null if you don't have an existing KVM storage pool that caches all OS images. For better efficiency, please cerate a KVM storage pool and cache the following OS images:
- jammy-server-cloudimg-amd64.img: Download from https://cloud-images.ubuntu.com/jammy/current/jammy-server-cloudimg-amd64.img
- windows-server-2022.qcow2: See Prepare Windows VM
Multiple KVM Hosts via VXLAN
VXLAN creates a virtual network on top of the physical network to enable the communication among multiple KVM hosts. Use the setup-sut-kvm.sh script to setup each KVM host.
- Modify the
script/terraform/terraform-config.kvm.tfas follows:
...
# multiple KVM hosts
variable "kvm_hosts" {
  default = [{
    user = "<user>"
    host = "<kvm-host1-ip>"
    port = 22
    # DHCP must be enabled on the network interface
    networks = [ "wsfbr0", "default" ]
    # if specified, os image will reuse the storage pool
    # images (with same image names.)
    pool = null
  }, {
    user = "<user>"
    host = "<kvm-host2-ip>"
    port = 22
    # DHCP must be enabled on the network interface
    networks = [ "wsfbr0", "default" ]
    # if specified, os image will reuse the storage pool
    # images (with same image names.)
    pool = null
  }]
}
wsfbr0 network interface is used for inter-KVM host communication and the default network interface is used to communicate to the Internet.
See Also: Control Where VMs Are Created
Multiple KVM Hosts via Bridged Network
You can also use bridged networking among KVM hosts. The VMs created by each KVM host connect via bridged networking. Since most IT infrastructures discourage or prohibit bridged networking. We need to add a JumpHost to isolate the VM network from the IT network, as follows:
flowchart LR;
  net1((IT Network));;
  hub[Jump Host];;
  net2((VM Network));;
  kvm1[KVM Host1];;
  kvm2[KVM Host2];;
  kvm3[KVM Host3];;
  net1 <--> hub <--> |.101| net2;
  net2 <--> |.105| kvm1;
  net2 <--> |.106| kvm2;
  net2 <--> |.107| kvm3;
JumpHost Setup
The JumpHost is equipped with two network interfaces: a primary network interface connects to the IT network and a secondary network interface connects to the VM network.
Proxy Server
We need to install a squid proxy server on the JumpHost so that KVM-Host1-3 can access to the IT network through the socks5 proxy.
Assume the VM network is 192.168.121.0/24, the JumpHost IP address is 192.168.121.101, the squid configuration is as follows:
# /etc/squid/squid.conf
acl localnet src 192.168.121.0/24       # RFC 1918 local private network (LAN)
acl localnet src fc00::/7               # RFC 4193 local private network range
acl localnet src fe80::/10              # RFC 4291 link-local (directly plugged) machines
acl SSL_ports port 443
acl Safe_ports port 80          # http
acl Safe_ports port 21          # ftp
acl Safe_ports port 443         # https
acl Safe_ports port 70          # gopher
acl Safe_ports port 210         # wais
acl Safe_ports port 1025-65535  # unregistered ports
acl Safe_ports port 280         # http-mgmt
acl Safe_ports port 488         # gss-http
acl Safe_ports port 591         # filemaker
acl Safe_ports port 777         # multiling http
acl intel dstdomain .intel.com
always_direct allow intel
never_direct allow !intel
cache_peer proxy-dmz.intel.com parent 911 0 default
http_access deny !Safe_ports
http_access allow localhost manager
http_access allow localnet
http_access deny manager
include /etc/squid/conf.d/*.conf
http_access allow localhost
http_access deny all
http_port 192.168.121.101:3128
coredump_dir /var/spool/squid
refresh_pattern ^ftp:           1440    20%     10080
refresh_pattern ^gopher:        1440    0%      1440
refresh_pattern -i (/cgi-bin/|\?) 0     0%      0
refresh_pattern \/(Packages|Sources)(|\.bz2|\.gz|\.xz)$ 0 0% 0 refresh-ims
refresh_pattern \/Release(|\.gpg)$ 0 0% 0 refresh-ims
refresh_pattern \/InRelease$ 0 0% 0 refresh-ims
refresh_pattern \/(Translation-.*)(|\.bz2|\.gz|\.xz)$ 0 0% 0 refresh-ims
refresh_pattern .               0       20%     4320
DHCP Server
Optionally, if there is no DHCP server on the VM network, we can install a DHCP server on the JumpHost as well:
The DHCP configuration is as follows:
# /etc/dhcp/dhcpd.conf
option domain-name "iotg";
default-lease-time 600;
max-lease-time 7200;
ddns-update-style none;
authoritative;

subnet 192.168.121.0 netmask 255.255.255.0 {
  range 192.168.121.20 192.168.121.100;
  option routers 192.168.121.101;
}
SSH Tunnels
We need to create a few SSH tunnels, each corresponding to a KVM host. This is required by the terraform libvirtd plugin, which does not understand how to access KVM hosts behind a JumpHost. Thus we create SSL tunnels to allow direct access to the KVM hosts via different ports on the JumpHost.
Assume the KVM host IP addresses are 192.168.121.105-107:
ssh -fNL '*:12105:192.168.121.105:22' root@192.168.121.105
ssh -fNL '*:12106:192.168.121.106:22' root@192.168.121.106
ssh -fNL '*:12107:192.168.121.107:22' root@192.168.121.107
KVM Host Setup
We need to create a network bridge and bind the physical network to it:
This is the setup of the KVM host 192.168.121.105:
# /etc/netplan/bridge.yaml
network:
  version: 2

  ethernets:
    enp136s0f3:
      dhcp4: false
      dhcp6: false

  bridges:
    br0:
      interfaces: [enp136s0f3]
      addresses: [192.168.121.105/24]
      # gateway4 is deprecated, use routes instead
      routes:
      - to: default
        via: 192.168.121.101
        metric: 100
        on-link: true
      mtu: 1500
      nameservers:
        addresses: [8.8.8.8]
      parameters:
        stp: true
        forward-delay: 4
      dhcp4: yes
      dhcp6: no

# bridge.yaml
<network>
  <name>wsfbr0</name>
  <forward bridge="br0" />
  <bridge name='wsfbr0' stp='on' delay='0'/>
  <dns enable='no'/>
  <ip address='172.22.0.2' prefix='24'/>
</network>

$ virsh net-create --file bridge.yaml
Proxy Setting
Finally, add the proxy settings to /etc/environment:
# /etc/environment
http_proxy=http://192.168.121.101:3128
https_proxy=http://192.168.121.101:3128
no_proxy=localhost,127.0.0.1
Control Where VMs Are Created
With multiple KVMs, you can control where each VM is provisioned by changing the kvm_hosts list:
variable "worker_profile" {
  default = {
    name = "worker"
    cpu_core_count = 2
    memory_size = 2
    vm_count = 1

    os_image = null
    os_type = "ubuntu2204"
    os_disk_size = 50

    data_disk_spec = null
    network_spec = null

    # Specifies which KVM host must be used to host
    # different workers.
    kvm_hosts = [ 0, 1, 2, 0, 1, 2 ]
  }
}
kvm_hosts definition. The line kvm_hosts = [ 0, 1, 2, 0, 1, 2 ] specifies that the first worker-0 should be created on the first KVM host, the next worker-1 will be created on the second KVM host, etc.
Trouble Shoot
If you need to login to the VM instances,
- For Linux VM instances, use ./debug.sh to go into the terraform container, and then use ssh -i ssh_access.key -p <port> <user>@<ip> to login to the Linux VM instances, where <port>, <user>, and <ip> are VM instance information available in the inventory.yaml file.
- For Windows VM instances, use virsh domdisplay <instance-name> to retrieve the spice URL, similar to spice://10.165.31.154:5901. Then you can access the Windows display via a spice viewer. You can get the randomly generated Windows password in the inventory.yaml file.
Please note that if you spice URL is local only:
spice://127.0.0.1:5901, then you cannot access to the spice display remotely. To workaround, you can setup ssh port forwarding as follows:ssh -LfN 5901:127.0.0.1:5901 <user>@<kvm-host>, which port-forwards the spice connection of the KVM host to your local 5901 port.
Advanced Topic: Create VM OS Images
Create Windows OS Image
This section describes the steps to create any custom Windows OS images to be used by the WSF terraform KVM backend.
Required ISO:
Download the following ISO'es:
- Windows ISO: Download the Windows Server 2022 from the Microsoft* evaluation center.
virtio-winISO: Downloadvirtio-winfrom github.
Prepare Windows VM:
Launch the Windows VM as follows:
virt-install --connect qemu:///system \
  --name ws2022 --ram 8192 --vcpus 8 \
  --network network=default,model=virtio \
  --disk path=windows-server-2022.qcow2,format=qcow2,device=disk,bus=virtio,size=11 \
  --os-type windows --os-variant win2k19 \
  --cdrom windows-server-2022.iso \
  --disk path=virtio.iso,device=cdrom \
  --graphics spice,listen=10.165.31.154
windows-server-2022.iso is the Windows ISO, and virtio.iso is the virtio-win ISO, and 10.165.31.154 is the public IP address of your KVM host.
You can now continue the Windows Server setup with any spice viewer at spice://10.165.31.154:5901:
- Select
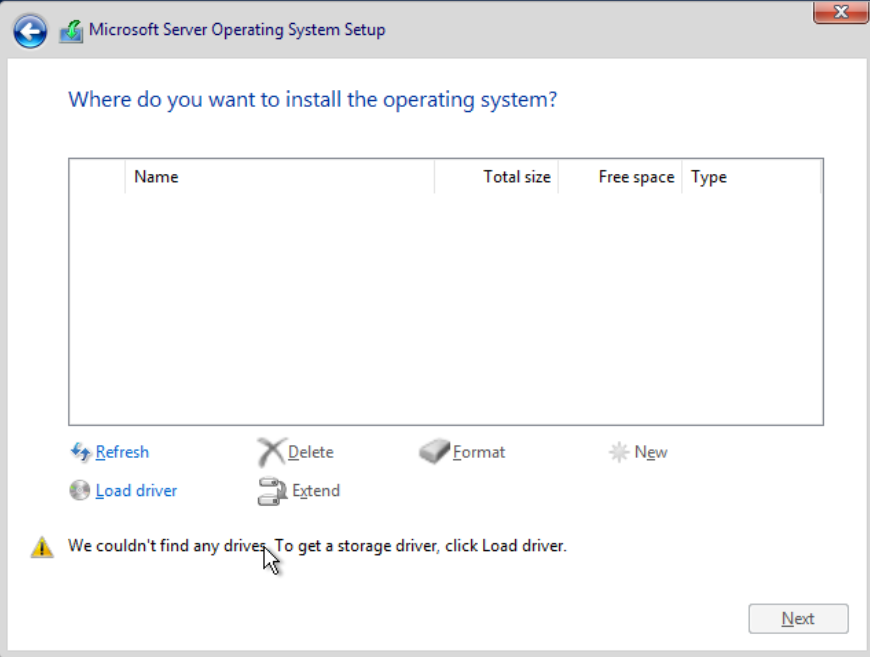
Windows Server 2022 Standard Evaluation (Desktop Experience): - Select
load driverto load thevirtiostorage driver from thevirtio-wincdrom.
After the OS setup, continue the VM setup:
- Bring up Device Manager. Install the virtio network driver (and more device drivers) from your virtio-win cdrom.
- Set execution policy unrestricted with powershell:
- Use
diskpartto delete any system recovery partition, and useComputer Management->Disk Managementto expanddisk0to the full extent. This is critical so that the disk can be expanded later to other sizes.
- Download
cloudbase-init:
Invoke-WebRequest -Uri https://github.com/cloudbase/cloudbase-init/releases/download/1.1.4/CloudbaseInitSetup_1_1_4_x64.msi -OutFile CloudbaseInitSetup_1_1_4_x64.msi -Proxy http://proxy-dmz.intel.com:911
- Install
cloudbase-init. During the installation, change the username toAdministratorat this screen, and then clickInstallto installcloudbase-init. Pause to modify a few files in the next step, before proceeding to the final screen.
- Modify
c:\Program Files\Cloudbase Solutions\Cloudbase-init\conf\cloudbase-init-unattended.conf:
metadata_services=cloudbaseinit.metadata.services.nocloudservice.NoCloudConfigDriveService,cloudbaseinit.metadata.services.base.EmptyMetadataService
plugins=cloudbaseinit.plugins.common.sethostname.SetHostNamePlugin,cloudbaseinit.plugins.windows.createuser.CreateUserPlugin,cloudbaseinit.plugins.windows.extendvolumes.ExtendVolumesPlugin,cloudbaseinit.plugins.windows.winrmlistener.ConfigWinRMListenerPlugin,cloudbaseinit.plugins.common.userdata.UserDataPlugin
allow_reboot=true
- Go back to the
cloudbase-initinstallation screen. Select bothsysprepandshutdown, and then clickFinishto complete the installation. Wait untilsysprepis completed and the VM is shutdown.
You can now copy your windows-server-2022.qcow2 to an antifactory for reuse with KVM.
Preparing Infrastructure Setup Memory
Source: doc/user-guide/preparing-infrastructure/setup-memory.md
The memory labels are used to check if the workload minimum memory size is available.
Assume the label is HAS-SETUP-MEMORY-192, the workload minimum memory size is 192 GB.
Preparing Infrastructure Setup Module
Source: doc/user-guide/preparing-infrastructure/setup-module.md
The set of HAS-SETUP-MODULE labels specify the request of installing kernel modules that are part of the OS distribution but not by default installed during boot.
Module Setup
The label should be specified in the format of HAS-SETUP-MODULE-<module-name>, where <module-name> is the module name.
System Setup
The kernel module can be installed as follows:
Node Labels
Add a node label to the worker node(s):
- HAS-SETUP-MODULE-msa: optional
Preparing Infrastructure Setup Network
Source: doc/user-guide/preparing-infrastructure/setup-network.md
For network workload, the test environment must be prepared in advance.
Install high-speed network NIC and link multiple workers together using either a high-speed switch or point-to-point cross-link cables. The network interface can be either a physical interface or a logical bond of multiple physical interfaces.
For example, at least two Ice Lake (or Sapphire Rapids) Linux hosts running CentOS Stream. On each Linux Host, you shall install one Intel E810-CQDA2 or E810-2CQDA2 100GE NIC adaptor (each adaptor has two 100GE ports) under CPU0 IIO root port PCIe bus (DO NOT install the 100GE NIC adaptor under PCH PCIe bus).
Network Setup
-
Use two 100GE copper(or optical) cables to connect those 100GE ports, connection method:
> Note: Make sure those 100GE ports is link up from NIC ports LED green light after machine power on again -
Make sure you Linux Hosts installed Linux kernel 100GE driver package "ice" for E810 adaptor:
Use Linux command to make sure ice driver/firmware version and 100GE ports link up Status/Duplex/Speed is 100GE full duplex link up.
- ethX is the interface name of each 100GE port in Linux host
ifconfigoutput. - you can use Linux kernel in-tree ice driver package. Just FYI: latest ice driver package download: https://sourceforge.net/projects/e1000/files/ice%20stable/
- ethX is the interface name of each 100GE port in Linux host
-
Use ifconfig command to config correct IP address with two different subnets(eg, 192.168.8.x and 192.168.9.x) for two 100GE connections, ping each other Linux Host to make sure those 100GE connections works fine;
For Example, you can configure IP address like this:
Host0 100GE physical port0(192.168.8.88) <-> Host1 100GE physical port0(192.168.8.99).
Host0 100GE physical port1(192.168.9.88) <-> Host1 100GE physical port1(192.168.9.99).- Host0
- Host1
- Host0
-
On each Linux host, use command to find out two E810 devices PCIe bus:device:function numbers, bind E810 PCIe devices to DPDK will use this PCIe bus:device:function number.
-
On each Linux host, install currently running kernel version kernel-devel package, then you can compile kernel modules .ko;
- make sure installed kernel-devel version equals
uname -rversion.
- make sure installed kernel-devel version equals
-
On each Linux host, we now suggest to bind NIC port to vfio-pci because igb_uio is not supported in newest OS.
To use vfio-pci we need to add intel_iommu=on iommu=pt to the Linux Boot Command line.
Also enable Intel vt-d in bios:EDKII Menu → Socket Configuration → IIO Configuration → Intel VT for directed IO (VT-d) → Intel VT for directed IO → Enable
Command to check Virtualization Technology and IOMMU enable:
Then plugin vfio-pci module:
7. On each Linux host, use command to set 100GE ports as ifconfig down state. * if E810 ports is ifconfig up state, it cannot bind to DPDK vfio-pci. -
On each Linux Host, download DPDK21.11.tar.xz, decompress it, use dpdk-devbind.py to bind 100GE ports to DPDK vfio-pci
wget http://fast.dpdk.org/rel/dpdk-21.11.tar.xz tar xf dpdk-21.11.tar.xz cd dpdk-stable-21.11/usertools ./dpdk-devbind.py --status ./dpdk-devbind.py --bind=vfio-pci bus:dev:func bus:dev:func ./dpdk-devbind.py --status-
Note: if your dpdk-devbind.py cannot running, run:
-
Note: if you want to bind 100GE port to kernel driver "ice" again run:
-
-
Use these commands to add labels to K8S nodes.
Currently workloads l3fwd/vppfib/ngfw/ovs-dpdk/pktgen need this label to schedule.
It indicates that the two 100GE ports have been bound to DPDK vfio-pci driver on the Linux host correctly.
-
On Linux grub boot up command line, you need to setup huge page numbers >= 2048.
The workload requests 2048 2MB hugepages. See Hugepage Setup for setup instructions.
After properly setup two Linux hosts 2MB hugepages, use these commands to make K8S two nodes label, currently l3fwd/pktgen k8s scheduling need this label.
-
Install K8S/Docker environment, configure one Linux host as k8s master and node, another Linux host as k8s node.
This workload can run with K8S backend; this workload cannot run with single host Docker backend;
-
Create configuration file named
network_env.confin the etc directory. This file contains 100G port or device information. The context should follow the following format:/etc/network_env.confdpdk_port1=0000:38:00.0 dpdk_port2=0000:38:00.1 dsa_dev1=0000:6a:01.0 dsa_dev2=0000:6f:01.0 dpdk_port1_srcmac_l3fwd=0xb4,0x96,0x91,0xb2,0xa6,0x48 dpdk_port2_srcmac_l3fwd=0xb4,0x96,0x91,0xb2,0xa6,0x49 dpdk_port1_destmac_l3fwd=0xb4,0x96,0x91,0xc3,0x85,0xd8 dpdk_port1_destmac_l3fwd_tx=b4:96:91:c3:85:d8 dpdk_port2_destmac_l3fwd=0xb4,0x96,0x91,0xc3,0x85,0xd9 dpdk_port2_destmac_l3fwd_tx=b4:96:91:c3:85:d9 dpdk_port_mac1=0xb4,0x96,0x91,0xb2,0xa5,0x10 dpdk_port_mac2=0xb4,0x96,0x91,0xb2,0xa5,0x11 neigh_port_mac1=0xb4,0x96,0x91,0x9b,0x79,0x38 neigh_port_mac2=0xb4,0x96,0x91,0x9b,0x79,0x39-
dpdk_port[1-9] means 100G port pci number.This port is bound to vfio_pci and used by dpdk. You can use command
lspci | grep Eth | grep E810to get pci number. -
dsa_dev[1-9] means DSA device number.For Intel® DSA devices, they are currently (at time of writing) appearing as devices with type “0b25”, due to the absence of pci-id database entries for them at this point. This device is bound to vfio_pci and used by dpdk. You can use command
lspci | grep 0b25to get dsa device number. -
dpdk_port_mac[1-9]: MAC address of NIC port with format as example 0xb4,0x96,0x91,0xb2,0xa6,0xd8.
-
neigh_port_mac[1-9]: MAC address of NIC port which connected with dpdk_port on another test machine.
-
dpdk_port[1-9]_srcmac_l3fwd: MAC address of NIC in this host port with format as example 0xb4,0x96,0x91,0xb2,0xa6,0x48.
-
dpdk_port[1-9]_destmac_l3fwd: MAC address of NIC port which connected with dpdk_port on another test machine.
-
dpdk_port[1-9]_destmac_l3fwd_tx: MAC address of NIC port which connected with dpdk_port on another test machine. Format should be b4:96:91:c3:85:d8
-
A workload can request network as follows:
- HAS-SETUP-NETWORK-SPEC-1: The worker node must have a set of network, whose specification, netwrok_spec_1, is specified in the terraform configuration files.
Node Labels:
Label the worker nodes with the following node labels:
- HAS-SETUP-NIC-25G=yes: Optional.
- HAS-SETUP-NIC-40G=yes: Optional.
- HAS-SETUP-NIC-100G=yes: Optional.
- HAS-SETUP-DPDK=yes: Required.
- HAS-SETUP-HUGEPAGE-2048kB-2048=yes: Required.
- HAS-SETUP-NETWORK-SPEC-1=yes: The worker node is equipped with the network described in network_spec_1.
See Also:
Preparing Infrastructure Setup Nfd
Source: doc/user-guide/preparing-infrastructure/setup-nfd.md
Node Feature Discovery (NFD) lists platform capabilities and can be used for intelligent workload scheduling in Kubernetes.
Note: NFD + Intel Device Plugins can be achieved in SF through Ansible automation please refer to roles available here.
Intel Device Plugins
The Intel Device Plugins for Kubernetes provides a collection of device plugins that advertise Intel hardware resources.
Currently, the operator can support QAT, SGX device plugins etc…
Benefits of Completing WL's With NFD Based Labels Accompanying Intel Device Plugins
-
As much as possible, an Ansible role is designed to automate both NFD and Intel DP projects to reduce manual workload
-
After NFD + Intel Device Plugins configured, WL’s can be triggered with no need for complicated or hardcoded values such as hardware type, hugepages, OS’s etc. It is more robust for WL's to rely on NFD labels which will show whether SGX, QAT, etc. are properly configured and present in the system.
Note: Additionally, in testing, it was observed that Intel Device Plugins configured with NFD resulted in faster execution time for WL's such as OpenSSL3-RSAMB
Required: Installation of the drivers QAT, SGX etc is expected else Intel Device Plugins might end up with issues.
-
Example of QAT labels is as under
Note: Please update labels in WL’s before execution, for example in OpenSSL3-RSAMB WL, QAT lables should be updated as under
workload/OpenSSL3-RSAMB/kubernetes-config.yaml.m4
workload/OpenSSL3-RSAMB/cluster-config.yaml.m4
Note: Same can be achieved with all SGX related / dependent WL's
and
Note: Same can be achieved with all DLB related / dependent WL's
and
Note: Same can be achieved with all DSA related / dependent WL's
and
intel.feature.node.kubernetes.io/dsa
Verify Node Feature Discovery
To verify that NFD in Kubernetes is running as expected, use the following command:
Listing labels for Node./node:
 feature.node.kubernetes.io/kernel-config.NO_HZ=true
 feature.node.kubernetes.io/cpu-pstate.turbo=true
 feature.node.kubernetes.io/cpu-cpuid.X87=true
 feature.node.kubernetes.io/cpu-cpuid.MOVDIR64B=true
 feature.node.kubernetes.io/cpu-rdt.RDTCMT=true
 kubernetes.io/arch=amd64
 feature.node.kubernetes.io/cpu-cpuid.AVX512FP16=true
 feature.node.kubernetes.io/cpu-cpuid.AVX512VPOPCNTDQ=true
 feature.node.kubernetes.io/cpu-power.sst_bf.enabled=true
 feature.node.kubernetes.io/system-os_release.VERSION_ID=22.04
 intel.power.node=true
 feature.node.kubernetes.io/cpu-cpuid.OSXSAVE=true
 intel.feature.node.kubernetes.io/dlb=true
 feature.node.kubernetes.io/cpu-cpuid.AVX512IFMA=true
 feature.node.kubernetes.io/cpu-cpuid.AVX512BF16=true
 feature.node.kubernetes.io/cpu-cpuid.AVX512BITALG=true
 feature.node.kubernetes.io/cpu-cpuid.AMXBF16=true
 feature.node.kubernetes.io/kernel-config.NO_HZ_IDLE=true
 feature.node.kubernetes.io/cpu-rdt.RDTL2CA=true
 feature.node.kubernetes.io/cpu-cstate.enabled=true
 feature.node.kubernetes.io/pci-0b40_8086.present=true
 feature.node.kubernetes.io/cpu-cpuid.VAES=true
 feature.node.kubernetes.io/kernel-version.revision=0
 intel.feature.node.kubernetes.io/qat=true
 feature.node.kubernetes.io/kernel-version.full=5.15.0-25-generic
 cndp=true
 feature.node.kubernetes.io/cpu-cpuid.FMA3=true
 feature.node.kubernetes.io/cpu-cpuid.SHA=true
 ethernet.intel.com/intel-ethernet-present=
 feature.node.kubernetes.io/cpu-cpuid.SERIALIZE=true
 feature.node.kubernetes.io/cpu-cpuid.CETIBT=true
 feature.node.kubernetes.io/pci-0b40_8086.sriov.capable=true
 feature.node.kubernetes.io/cpu-cpuid.TSXLDTRK=true
 kubernetes.io/hostname=node
 feature.node.kubernetes.io/cpu-cpuid.LAHF=true
 feature.node.kubernetes.io/kernel-version.minor=15
 feature.node.kubernetes.io/cpu-cpuid.MOVDIRI=true
 feature.node.kubernetes.io/system-os_release.VERSION_ID.major=22
 feature.node.kubernetes.io/cpu-cpuid.XSAVE=true
 feature.node.kubernetes.io/cpu-cpuid.AVX512VBMI2=true
 feature.node.kubernetes.io/cpu-cpuid.AVX512VBMI=true
 feature.node.kubernetes.io/cpu-hardware_multithreading=true
 feature.node.kubernetes.io/cpu-cpuid.WBNOINVD=true
 feature.node.kubernetes.io/cpu-model.id=143
 feature.node.kubernetes.io/cpu-cpuid.STIBP=true
 feature.node.kubernetes.io/kernel-version.major=5
 intel.feature.node.kubernetes.io/dsa=true
 feature.node.kubernetes.io/cpu-cpuid.SCE=true
 feature.node.kubernetes.io/system-os_release.ID=ubuntu
 feature.node.kubernetes.io/cpu-cpuid.WAITPKG=true
 feature.node.kubernetes.io/cpu-cpuid.IBPB=true
 feature.node.kubernetes.io/cpu-rdt.RDTMON=true
 feature.node.kubernetes.io/cpu-cpuid.VMX=true
 feature.node.kubernetes.io/cpu-rdt.RDTMBA=true
 feature.node.kubernetes.io/cpu-cpuid.CLDEMOTE=true
 feature.node.kubernetes.io/cpu-cpuid.MOVBE=true
 intel.feature.node.kubernetes.io/sgx=true
 feature.node.kubernetes.io/cpu-cpuid.FXSR=true
 feature.node.kubernetes.io/cpu-sgx.enabled=true
 feature.node.kubernetes.io/cpu-cpuid.AMXINT8=true
 feature.node.kubernetes.io/cpu-cpuid.CMPXCHG8=true
 feature.node.kubernetes.io/storage-nonrotationaldisk=true
 kubernetes.io/os=linux
 feature.node.kubernetes.io/cpu-cpuid.CETSS=true
 feature.node.kubernetes.io/memory-numa=true
 node-role.kubernetes.io/worker=
 feature.node.kubernetes.io/cpu-cpuid.ENQCMD=true
 feature.node.kubernetes.io/cpu-cpuid.AVX512VL=true
 feature.node.kubernetes.io/cpu-cpuid.VPCLMULQDQ=true
 feature.node.kubernetes.io/network-sriov.capable=true
 feature.node.kubernetes.io/cpu-pstate.status=active
 feature.node.kubernetes.io/cpu-cpuid.GFNI=true
 feature.node.kubernetes.io/cpu-cpuid.AVX512VNNI=true
 feature.node.kubernetes.io/cpu-cpuid.AVX=true
 beta.kubernetes.io/arch=amd64
 feature.node.kubernetes.io/cpu-cpuid.AESNI=true
 feature.node.kubernetes.io/cpu-cpuid.AVX512VP2INTERSECT=true
 feature.node.kubernetes.io/cpu-cpuid.AVX2=true
 feature.node.kubernetes.io/cpu-cpuid.AVX512BW=true
 feature.node.kubernetes.io/cpu-cpuid.AVX512CD=true
 feature.node.kubernetes.io/cpu-rdt.RDTL3CA=true
 feature.node.kubernetes.io/cpu-model.vendor_id=Intel
 feature.node.kubernetes.io/cpu-cpuid.AVX512F=true
 feature.node.kubernetes.io/system-os_release.VERSION_ID.minor=04
 feature.node.kubernetes.io/cpu-cpuid.ADX=true
 feature.node.kubernetes.io/cpu-pstate.scaling_governor=powersave
 feature.node.kubernetes.io/cpu-cpuid.AVX512DQ=true
 feature.node.kubernetes.io/pci-0300_1a03.present=true
 beta.kubernetes.io/os=linux
 feature.node.kubernetes.io/cpu-rdt.RDTMBM=true
 feature.node.kubernetes.io/cpu-cpuid.FXSROPT=true
 feature.node.kubernetes.io/cpu-cpuid.AMXTILE=true
 feature.node.kubernetes.io/cpu-model.family=6
Listing labels for Node./controller:
 kubernetes.io/os=linux
 node-role.kubernetes.io/control-plane=
 node.kubernetes.io/exclude-from-external-load-balancers=
 beta.kubernetes.io/arch=amd64
 beta.kubernetes.io/os=linux
 kubernetes.io/arch=amd64
 kubernetes.io/hostname=controller
 ```

#### Verify Intel Device Plugin Operator

```shell
kubectl get pods --all-namespaces | grep 'inteldeviceplugins'
Verify Intel QAT Device Plugin
{
  "cndp/e2e": "1",
  "cpu": "125",
  "ephemeral-storage": "282566437625",
  "hugepages-1Gi": "8Gi",
  "hugepages-2Mi": "64Gi",
  "intel.com/ens107_intelnics_1": "1",
  "intel.com/ens107_intelnics_2": "4",
  "intel.com/ens107_intelnics_3": "1",
  "memory": "186797444Ki",
  "pods": "110",
  "power.intel.com/balance-performance": "76",
  "power.intel.com/balance-performance-node": "76",
  "power.intel.com/balance-power": "102",
  "power.intel.com/balance-power-node": "102",
  "power.intel.com/performance": "51",
  "power.intel.com/performance-node": "51",
  "qat.intel.com/generic": "32",
  "sgx.intel.com/enclave": "20",
  "sgx.intel.com/provision": "20"
}
Verify Intel SGX Device Plugin
{
  "cndp/e2e": "1",
  "cpu": "125",
  "ephemeral-storage": "282566437625",
  "hugepages-1Gi": "8Gi",
  "hugepages-2Mi": "64Gi",
  "intel.com/ens107_intelnics_1": "1",
  "intel.com/ens107_intelnics_2": "4",
  "intel.com/ens107_intelnics_3": "1",
  "memory": "186797444Ki",
  "pods": "110",
  "power.intel.com/balance-performance": "76",
  "power.intel.com/balance-performance-node": "76",
  "power.intel.com/balance-power": "102",
  "power.intel.com/balance-power-node": "102",
  "power.intel.com/performance": "51",
  "power.intel.com/performance-node": "51",
  "qat.intel.com/generic": "32",
  "sgx.intel.com/enclave": "20",
  "sgx.intel.com/provision": "20"
}
"feature.node.kubernetes.io/cpu-sgx.enabled": "true",
"intel.feature.node.kubernetes.io/sgx": "true",
Verify Intel DLB Device Plugin
{
  "cndp/e2e": "0",
  "cpu": "125",
  "dlb.intel.com/pf": "0",
  "dsa.intel.com/wq-user-dedicated": "0",
  "ephemeral-storage": "282566437625",
  "hugepages-1Gi": "4Gi",
  "hugepages-2Mi": "2Gi",
  "memory": "256095196Ki",
  "pods": "110",
  "power.intel.com/balance-performance": "76",
  "power.intel.com/balance-performance-node": "76",
  "power.intel.com/balance-power": "102",
  "power.intel.com/balance-power-node": "102",
  "power.intel.com/performance": "51",
  "power.intel.com/performance-node": "51",
  "qat.intel.com/generic": "16",
  "sgx.intel.com/enclave": "0",
  "sgx.intel.com/provision": "0"
}
Verify Intel DSA Device Plugin
{
  "cndp/e2e": "0",
  "cpu": "125",
  "dlb.intel.com/pf": "0",
  "dsa.intel.com/wq-user-dedicated": "0",
  "ephemeral-storage": "282566437625",
  "hugepages-1Gi": "4Gi",
  "hugepages-2Mi": "2Gi",
  "memory": "256095196Ki",
  "pods": "110",
  "power.intel.com/balance-performance": "76",
  "power.intel.com/balance-performance-node": "76",
  "power.intel.com/balance-power": "102",
  "power.intel.com/balance-power-node": "102",
  "power.intel.com/performance": "51",
  "power.intel.com/performance-node": "51",
  "qat.intel.com/generic": "16",
  "sgx.intel.com/enclave": "0",
  "sgx.intel.com/provision": "0"
}
Ensure Intel Device Plugins Are Working After Deployment
inteldeviceplugins-system       intel-dlb-plugin-2plwt                                        1/1     Running   12 (16m ago)   48m
inteldeviceplugins-system       intel-dsa-plugin-l946v                                        1/1     Running   12 (15m ago)   47m
inteldeviceplugins-system       intel-qat-plugin-7dxmj                                        1/1     Running   1 (13m ago)    49m
inteldeviceplugins-system       intel-sgx-plugin-dwjkg                                        1/1     Running   12 (16m ago)   49m
inteldeviceplugins-system       inteldeviceplugins-controller-manager-59b46b7949-55hvg        2/2     Running   0              10m
Preparing Infrastructure Setup Nginx Cache
Source: doc/user-guide/preparing-infrastructure/setup-nginx-cache.md
This document is a guide for setting up Nginx-DLB benchmark environment, including Hardware platform and Software configuration on storage.
HW Prerequisites
- Setup 3 servers: one node (client) for client deployment; 2 node for cache server (worker-0) and content server (worker-1) deployment.
- Cache server (worker-0) requires 5 NVMe disks.
K8S Labels configuaration
Please finish the section, Storage configuration, then label the corresponding nodes.
Command examples:
- Label:
- Unlabel:
Nginx cache server worker-0:*
HAS-SETUP-NGINX-CACHE=yes
Storage configuration
This should be done on worker-0.
-
Prepare 5 nvme disk for nginx cache server pod. nvme? means multiple nvme disk.
-
Check NVMe drives and Partition drives ```shell command ls /dev/nvme*
-
Format drives as ext4 (or xfs):
shell command mkfs.ext4 /dev/nvme1n1 mkfs.ext4 /dev/nvme2n1 mkfs.ext4 /dev/nvme3n1 mkfs.ext4 /dev/nvme4n1 mkfs.ext4 /dev/nvme5n1 -
Create cache mountpoints and mount to four pairs
shell command
    mkdir /nginx/cache1
    mount -o rw,noatime,seclabel,discard /dev/nvme1n1 /nginx/cache1
    mkdir /nginx/cache2
    mount -o rw,noatime,seclabel,discard /dev/nvme2n1 /nginx/cache2
    mkdir /nginx/cache3
    mount -o rw,noatime,seclabel,discard /dev/nvme3n1 /nginx/cache3
    mkdir /nginx/cache4
    mount -o rw,noatime,seclabel,discard /dev/nvme4n1 /nginx/cache4
    mkdir /nginx/cache5
    mount -o rw,noatime,seclabel,discard /dev/nvme5n1 /nginx/cache5
Preparing Infrastructure Setup Qat In Tree
Source: doc/user-guide/preparing-infrastructure/setup-qat-in-tree.md
Intel® QuickAssist Technology allows data encryption and compression. In-tree setup is described in this document.
QAT In-tree Driver Setup For 4xxx Device
Check System Prerequisites
- Platform must have Intel® QuickAssist Technology QAT device such as "4xxx"
- QAT Physical Functions (PF's) can be determined as under:
check that these files exist:
/lib/firmware/qat_4xxx.bin or /lib/firmware/qat_4xxx.bin.xz
/lib/firmware/qat_4xxx_mmp.bin or /lib/firmware/qat_4xxx_mmp.bin.xz
if not, download form:
https://git.kernel.org/pub/scm/linux/kernel/git/firmware/linux-firmware.git/plain/qat_4xxx.bin
https://git.kernel.org/pub/scm/linux/kernel/git/firmware/linux-firmware.git/plain/qat_4xxx_mmp.bin
On updating these files run
to update kernel modules and initramfs.Required Kernel Information
- Linux kernel v5.11+ (This is for crypto, for compression use v5.17+)
- Fedora 34+ (for compression use 36+)
- RHEL 8.4+ (for compression use 9.0+)
BIOS Settings
- Intel
VT-dandSR-IOVmust be enabled in the platform (BIOS).
Grub Settings
Fedora:
sudo grubby --update-kernel=DEFAULT --args="intel_iommu=on vfio-pci.disable_denylist=1 iommu=pt default_hugepagesz=2M hugepagesz=2M hugepages=4096"- Reboot system
Ubuntu:
sudo vim /etc/default/grub- move to
GRUB_CMDLINE_LINUXaddintel_iommu=on vfio-pci.disable_denylist=1 iommu=pt default_hugepagesz=2M hugepagesz=2M hugepages=4096 sudo update-grub- Reboot system
Install QATLib
Fedora 34+, using software package manager
# Install QATLib
sudo dnf install -y qatlib-devel

# Add your user to qat group and re-login to make the change effective
sudo usermod -a -G qat `whoami`
sudo su -l $USER

# Make sure qat service is started properly and ready for use.
sudo systemctl stop qat.service
sudo systemctl enable qat.service
sudo systemctl restart qat.service
sudo systemctl status qat.service
Other Distributions: Building From Source
Fedora
# Install dependencies
sudo dnf update -y
sudo dnf install -y gcc systemd-devel automake autoconf libtool
sudo dnf install -y openssl-devel zlib-devel yasm
Ubuntu
# Install dependencies
sudo apt update -y
sudo apt install -y build-essential cmake g++ pkg-config wget make yasm nasm libboost-all-dev libnl-genl-3-dev zlib1g zlib1g-dev
apt install -y systemd m4 pkg-config libudev-dev libssl-dev autoconf libtool tar git libssl-dev
Build & install
git clone https://github.com/intel/qatlib
cd qatlib
./autogen.sh
./configure --prefix=/usr --enable-service
make -j
sudo make -j install
sudo make samples-install

# Make sure qat service is started properly and ready to use
sudo systemctl stop qat.service
sudo systemctl enable qat.service
sudo systemctl restart qat.service
sudo systemctl status qat.service
QAT Drivers Uninstall
Remove / clean-up of drivers / configurations. Especially helpful if QAT setup needs to be re-configured
sudo systemctl stop qat.service
# Move to dir location in which drivers / configuration are saved such as "/opt/intel/QAT" and execute mentioned below commands:
make uninstall
make clean
make distclean
References
Please refer to the following links for detailed information on QAT In-tree Driver Setup For 4xxx Device
-
https://github.com/intel/qatlib/blob/main/INSTALL
For more information on setting up PFs / VFs for specific QAT devices, please visit
- https://doc.dpdk.org/guides/cryptodevs/qat.html
Preparing Infrastructure Setup Terraform
Source: doc/user-guide/preparing-infrastructure/setup-terraform.md
The terraform backend can be used to validate workloads on a remote cluster, On-Premises or on Cloud.
Setup Terraform for Cloud Validation
- Follow the instructions in the WSF Cloud Setup to setup the development host.
- The terraform backend supports Cloud vendors such as
aws,gcp,azure,tencent,alicloud, andoracle. Each vendor has a corresponding configuration file:script/terraform/terraform-config.<SUT>.tf, where<SUT>is the Cloud vendor name. You can customize as needed.
Configure Cloud Account
If this is your first time, run the terraform build command:
Note: mentioned below commands should be executed from a build folder such as ~/workload-services-framework/build# make build_terraform
Then proceed with the Cloud account setup as follows:
make aws           # or make -C ../.. aws, if under build/workload/<workload>
$ aws configure    # please specify a region and output format as json
$ exit
make azure         # or make -C ../.. azure, if under build/workload/<workload>
$ az login
# if you have multiple subscriptions in your account, please set
# az account set --subscription="<subscription-id>"
$ exit
make gcp           # or make -C ../.. gcp, if under build/workload/<workload>
$ gcloud init --no-launch-browser
$ gcloud auth application-default login --no-launch-browser # Please make sure quota-project-id is set
$ gcloud auth activate-service-account --key-file <keyfile> # required only for running workloads in Google Kubernetes Engine
$ exit
make tencent       # or make -C ../.. tencent, if under build/workload/<workload>
$ tccli configure  # please specify a region
$ exit
make alicloud      # make -C ../.. alicloud, if under build/workload/<workload>
$ aliyun configure # please specify a region
$ exit
make oracle        # make -C ../.. oracle, if under build/workload/<workload>
$ oci setup config # please specify a compartment id and upload public key to the oracle cloud console
$ exit
Run Workload(s) Through Terraform
Cleanup Cloud Resources
If your terraform validation is interrupted for any reason, the Cloud resource may remain active. You can explicitly cleanup any Cloud resources as follows:
Note: mentioned below commands should be executed from the required workload folder such as ~/workload-services-framework/build/workload/OpenSSL3-RSAMB# make -C ../.. azure
Setup Terraform for On-Premises Validation
- Follow the instructions in the WSF On-Premises Setup to setup the On-Premises hosts.
- Customize
terraform-config.static.tfto specify your cluster information.
Under
script/terraform, you can create anyterraform-config.mysut.tfout ofterraform-config.static.tf, wheremysutis your sut name. Usecmake -DTERRAFORM_SUT=mysut ..to configure it.
Now you can run any workload as follows:
Setup Terraform for KVM Validation
- Follow the instructions in the WSF KVM Setup to setup the KVM environment.
- Customize
terraform-config.kvm.tfto specify your KVM host information.
Now you can run any workload as follows:
Telemetry Trace and Publishing Options
See Trace Module for available trace options. You can enable telemetry trace modules during the workload validation as follows:
Additionally, you can use --svrinfo to the TERRAFORM_OPTIONS to
automatically detect the platform information as follows:
See also: Publishing Module Options.
Debugging
While the workload evaluation is in progress, you can logon to the remote instances to debug any encountered issues. As terraform engine runs inside a container, you need to first login to the container as follows:
The script will bring you to the container shell where you can perform, from the current directory or /opt/workspace, additional operations such as examining the workload execution logs and logging onto the workload instances.
Files of interest:
- cluster-config.yaml: The workload cluster configuration definition.
- terraform-config.yaml: The workload terraform entry point.
- workload-config.yaml: The workload configuration parameters.
- kubernetes-config.yaml[.mod.yaml]: The kubernetes deployment script (for containerized workloads.)
- cluster.yaml: The ansible playbook to initialize the VM instances.
- deployment.yaml: The ansible playbook to run the workload.
- inventory.yaml: The provisioned VM information.
- tfplan.logs: The process logs.
- ssh_access.key[.pub]: The SSH keys for accessing to the VM instances.
- template/*: Source code used to provision VMs and evaluate workloads.
$ cat inventory.yaml
...
        worker-0:
          ansible_host: 35.92.225.114
          ansible_user: ubuntu
...
$ ssh -i ssh_access.key ubuntu@35.92.225.114
HINT: while working within the terraform container, if you need to ssh or scp data to public VMs, use the ssh identity ssh_access.key. If you are not under the default directory /opt/workspace, please use the absolute path.
For Example:
$ scp -r -i ssh_access.key /tmp/test.log <username>@<public_ip>:/tmp/
Warning: Permanently added '<public_ip>' (ED25519) to the list of known hosts.
test.log                                                                                                                                                                                                                                                    100%    5     0.1KB/s   00:00
Setting Breakpoint(s)
You can set one or many breakpoints by specifying the wl_debug option in TERRAFORM_OPTIONS or terraform-config.<sut>.tf:
The following <BreakPoint>s are supported:
- PrepareStage: Pause when the workload is about to setup the host environment.
- RunStage: Pause when the workload is about to start the workload execution.
- CleanupStage: Pause when the workload is about to cleanup.
When a breakpoint is reached, the execution is paused for an hour (as specified by the wl_debug_timeout value.) You can explicitly resume the execution by creating a signaling file under /opt/workspace, as follows:
Preparing Infrastructure Setup Wsf
Source: doc/user-guide/preparing-infrastructure/setup-wsf.md
This document describes the steps and scripts to setup host environment for workload evaluation and development on the Cloud or On-Premises.
Network topology
Network topology wise, the WSF assumes that there is a development (dev) machine for workload build and development, and a set of test machines (SUT, or System Under Test) for workload execution, as follows:
flowchart TD;
  dev[Development Host];;
  net((Network));;
  sut1[SUT1 Host];;
  sut2[SUT2 Host];;
  sut3[SUT3 Host];;
  dev <--> net;;
  net <--> sut1;;
  net <--> sut2;;
  net <--> sut3;;
where the SUT machines can be physical hosts in the On-Premesis case, or virtualized VMs in the Cloud or KVM execution. If Kubernetes is used, it is assumed that the SUT hosts form a Kubernetes cluster, where one of the SUTs be the Kubernetes controller.
For Cloud evaluation, we can usually provision as many VM instances as requried. For the On-Premesis setup, depending on resource constraints, there can be many variations of the above diagram. The followings are some of the common On-Premesis variations: | Name | Description and Restrictions | |:-----|:-------------------------| |Single Dev Default | A single dev machine also serves as a SUT. This is the default if you clone the repository without any changes. This is to quickly evaluate docker and Kubernetes single-container workloads or multiple containers without any node anti-affinity rules. The workloads cannot request any SUT system-level changes, such as hugepage, sysfs, or sysctls. Native workloads cannot run in this mode. Kubernetes uses a single-node setup with the controller untainted for execution, and a private registry (or the WSF official registry) on the same dev machine. Trace is not functional or accurate for most telemetry programs. | |Single Dev with Lookback | A single dev machine also serves as a SUT. Require configuration modification to ssh back to the dev machine for workload execution. This is to evaluate native, docker and Kubernetes single-container workloads or multiple containers workloads without any node anti-affinity rules. The workloads can request system-level changes such as hugepage, sysfs, and sysctls without any reboot of the system or restart of either the containerd, docker or kubelet service. Kubernetes uses a single-node setup with the controller untainted for execution, and a private registry (or the WSF official registry) on the same dev machine. Most trace programs are functional. | |Single dev as the Kubernetes controller | The dev machine also serves as a Kubernetes controller with additional Kubernetes worker nodes. This is to evaluate any native, docker and Kubernetes workloads. Must use a private registry (or the WSF official registry) for Kubernetes workload execution. The workloads can request any supported SUT system-level setups. Telemtry collections are fully functional. | |Dedicated Dev, Kubernetes controller and workers | The dev machine, the Kubernetes controller, and Kubernetes workers are all on dedicated ndoes. This is to evaluate any native, docker and Kubernetes workloads. For Kubernetes workload execution, it is optional to use any private registry. The workloads can request any supported SUT system-level setups. Telemtry collections are fully functional. |
In general, the WSF can work on any network topology, as long as the dev host can establish ssh (or winrm for Windows) connections to the SUT machines.
- Prerequisites
- Instructions of Cloud Setup
- Instructions of On-Premises Setup
- Instructions of KVM Setup
- Instructions of ITEP Setup
- Manual of Setup Scripts
Prerequisites
Ensure that your cluster hosts are properly setup in terms of hostname, networking, proxy and datetime:
- The hostname must be unique within your subnet and follow RFC-1178, i.e., matching pattern
[a-z][a-z0-9-]*. - The hostname is properly registered with DNS so that any of your cluster host can reach each other via hostname.
- If you are behind a corporate firewall, please setup
http_proxy,https_proxyandno_proxyin/etc/environment. - Sync your host datetime. An accurate system time is required for any credential authentication operations.
Cloud Setup
To develop or evaluate workloads for Cloud, you need a Linux development machine. The development machine can be used to build workloads and provision Cloud VMs. The workload execution results are saved back to the development machine before publishing to the WSF portal, if specified.
flowchart LR;
  dev[Development Host];;
  proxy[Proxy];;
  csp[Cloud Service Provider];;
  dev <--> proxy <--> csp;;
| Workload Type | Docker Registry | Dev Setup | SUT Setup | Registry Setup |
|---|---|---|---|---|
Native |
N/A |
setup-dev.sh |
N/A |
N/A |
docker/compose |
Optional |
setup-dev.sh |
N/A |
setup-reg.sh |
Kubernetes |
Optional |
setup-dev.sh |
N/A |
setup-reg.sh |
Use the following setup steps:
- Run the setup-dev.sh script to setup the development host.
- Follow the backend specific instructions to initialize Cloud accounts. See Terraform Cloud Setup.
Completely optional in this setup, run the
setup-reg.shscript, if you would like to setup a local docker registry for storing images or caching any public registry.
On-Premises Setup
Dedicated Dev and SUT
Start with a simple case, where the dev and the SUT hosts are dedicated. This is the recommended setup for simplicity and full functionality.
flowchart LR;
  dev[Dev Host];;
  net((Network));;
  sut1[SUT1 Host];;
  sut2[SUT2 Host];;
  sut3[SUT3 Host];;
  dev <--> net;;
  net <--> sut1;;
  net <--> sut2;;
  net <--> sut3;;
| Workload Type | Docker Registry | Dev Setup | SUT Setup | Registry Setup |
|---|---|---|---|---|
Native |
N/A |
setup-dev.sh |
setup-sut-native.sh |
N/A |
docker/compose |
Optional |
setup-dev.sh |
setup-sut-docker.sh |
setup-reg.sh |
Kubernetes |
Optional |
setup-dev.sh |
setup-sut-k8s.sh |
setup-reg.sh |
Use the following setup steps:
- Run the setup-dev.sh script to setup the dev host.
- Completely optional in this setup, run the setup-reg.sh script (on the dev host), if you plan to setup a local docker registry for building workloads and storing the built images.
- Depending on the workload types, you can run either the setup-sut-native.sh, setup-sut-docker.sh script or the setup-sut-k8s.sh script (on the dev host) to setup the SUT hosts. The native setup can run any baremetal native workloads. The docker setup can run most of the single-node containerized workloads (docker or docker compose). The Kubernetes setup can run all containerized workloads (not tied to any Cloud services) on premises.
- Valid for Cloud native workloads only, if you do not setup a local docker registry, please set
k8s_enable_registry: trueinscript/terraform/terraform-config.static.tf. The terraform backend will auto-create an incluster docker registry to serve any Kubernetes workers. - If you do have setup a local docker registry, make sure all SUT hosts can access to the docker registry securely. With
setup-reg.sh, this is done by appending all SUT hosts to thesetup-reg.shcommand line.
Combined Dev and Kuberenetes Controller
In this case, you can combine the dev host and the Kubernetes controller to save a physical machine. A valid docker registry is required to serve the docker images to the Kubernetes workers.
flowchart LR;
  dev[Dev Host<br>Controller<br>Registry];;
  net((Network));;
  sut1[K8S Worker1];;
  sut2[K8S Worker2];;
  sut3[K8S Worker3];;
  dev <--> net;;
  net <--> sut1;;
  net <--> sut2;;
  net <--> sut3;;
| Workload Type | Docker Registry | Dev Setup | SUT Setup | Registry Setup |
|---|---|---|---|---|
Native |
N/A |
setup-dev.sh |
setup-sut-native.sh |
N/A |
docker/compose |
Optional |
setup-dev.sh |
setup-sut-docker.sh |
setup-reg.sh |
Kubernetes |
Required |
setup-dev.sh |
setup-sut-k8s.sh |
setup-reg.sh |
Use the following setup steps:
- Run the setup-dev.sh script on the dev host.
- If you don't have a private registry, run the setup-reg.sh script to setup a private registry on the dev host. Make sure you append your SUT hosts to the command line so that the SUT hosts can securely access the private docker registry.
- Run the setup-sut-k8s.sh script to setup the workers. Use the dev host IP address as the controller IP address.
- Use
cmake -DREGISTRY=<registry_url> ..to set the private registry URL. - Set
k8s_enable_registry: falseinscript/terraform/terraform-config.static.tf. This is the default.
Single Host Dev+SUT
In a constrained environment, you can combine the dev and SUT hosts all onto the same physical host. The SUT access is through either the ansible local connection or a loop-back ssh connection. Please note that this is only for quick evaluation, the WSF scripts will not be able to perform automations that lead to reboot of the system, or restart of the containerd, dockerd, or kubelet service.
| Workload Type | Docker Registry | Dev Setup | SUT Setup | Registry Setup |
|---|---|---|---|---|
Native |
N/A |
setup-dev.sh |
setup-sut-native.sh |
N/A |
docker/compose |
Optional |
setup-dev.sh |
setup-sut-docker.sh |
setup-reg.sh |
Kubernetes |
Required |
setup-dev.sh |
setup-sut-k8s.sh |
setup-reg.sh |
Use the following setup steps:
- Run the setup-dev.sh script on the development host:
- If a registry is required, run the setup-reg.sh script on the dev host. Append all SUT info on the setup-reg.sh command line so that the SUTs can access to the registry securely.
- Run either the setup-sut-native.sh, setup-sut-docker.sh script or the setup-sut-k8s.sh script to setup the workers. As there is only a single physical host in this setup, only workloads that require a single SUT can proceed.
- Use
cmake -DREGISTRY=<registry_url> ..to set the private registry URL. - If you use ssh loopback, modify the dev machine username and IP address in
script/terraform/terraform-config.static.tf. - If the host has enough CPU cores and memory, suggest to use the KVM development setup for more flexibility.
KVM Setup
To evaluate workloads with KVM, you need a Linux dev machine and a KVM host. The KVM host can create as many VMs that can be used as the SUTs.
| Workload Type | Docker Registry | Dev Setup | SUT Setup |
|---|---|---|---|
Native |
N/A |
setup-dev.sh |
setup-sut-kvm.sh |
docker/compose |
Optional |
setup-dev.sh |
setup-sut-kvm.sh |
Kubernetes |
Optional |
setup-dev.sh |
setup-sut-kvm.sh |
Use the following setup steps:
- Make sure Virtualization is turned on in your KVM host BIOS.
- Run the setup-dev.sh script to setup the dev host.
- Run the setup-sut-kvm.sh script to setup the KVM host.
- Use
cmake -DTERRAFORM_SUT=kvm ..to use the kvm setup.HINT: To execute KVM setup for a specific workload, run the following command such as
cmake -DTERRAFORM_SUT=kvm -DPLATFORM=SPR -DBENCHMARK=OpenSSL3-RSAMB ../ - Modify the IP address and credentials of your KVM host in
script/terraform/terraform-config.kvm.tf.
ITEP Setup
To evaluate workloads with ITEP, you need to make sure ITEP is already deployed and status of edge cluster is already active.
Use the following setup steps:
- Run the [setup-itep.sh][setup-itep.sh-self] script to install all necessary prerequisites.
- Use
cmake -DTERRAFORM_SUT=itep ..to use the ITEP setup.HINT: To execute ITEP setup for a specific workload, run the following command such as
cmake -DTERRAFORM_SUT=itep -DPLATFORM=SPR -DBENCHMARK=OpenSSL3-RSAMB ../
Setup Scripts
Note: All scripts mentioned below, such as setup-dev.sh, setup-sut-kvm.sh, etc, are found inside
script/setup/and must be executed from there. -setup-dev.sh: Setup the dev host.
-setup-reg.sh: Setup a private docker registry.
-setup-sut-native.sh: Setup the SUT host for native workload execution.
-setup-sut-docker.sh: Setup the SUT host for docker/docker-compose workload execution.
-setup-sut-k8s.sh: Setup the SUT host for Kubernetes workload execution.
-setup-sut-kvm.sh: Setup the KVM host.
- [setup-itep.sh][setup-itep.sh-self]: Install all necessary prerequisites for ITEP.
setup-dev.sh
The setup-dev.sh script creates the host environment for building workloads and evaluating workloads.
The script does not have any arguments and performs the following options underneath:
- Install Intel certificates.
- Install packages: cmake, make, m4, and gawk. These are minimum system requirements.
- Install and setup docker on your host.
- Add an alias ctest=./ctest.sh to your ~/.bashrc.
options are:
- --nodaemonize: Do not install daemonize.
- --no-password: Do not ask for password. Use environment variable DEV_SUDO_PASSWORD where password is required.
The script requires sudo privilege. After the setup, for any changes to take effect, you must logout of the current ssh session and relogin the development host.
Setup-reg.sh
The setup-reg.sh script can help to create a private docker registry or a pass-through registry on the development host. The private docker registry can be used to save rebuilt docker images. A pass-through registry can provide a cached mirror to any official registries.
options are:
- --port: Specify the SSH port number. Default 22.-
--force: Force replacing any existing certificate.-
--no-password: Do not ask for password. Use environment variable DEV_SUDO_PASSWORD, SUT_SUDO_PASSWORD, and/or SUT_SSH_PASSWORD where password is required.
The mandated argument is the hostname or IP of the registry URL. The port is optional. The default port for a docker registry is 20666 and the default port for a pass-through registry is 20690. You can create both on the same host if required.
If a list of <user>@<host> is specified, the script will copy the registry certificate to the machines so that they can securely access the newly created docker registry.
Examples:
After the setup, you can set the REGISTRY value to be the registry URL, in the form of <hostname|ip>:<port>.
setup-sut-native.sh
The setup-sut-native.sh script creates the host environment for baremetal native workload execution. The script takes the following arguments:
options are:
- --port: Specify the SSH port number. Default 22.-
--no-password: Do not ask for password. Use environment variable DEV_SUDO_PASSWORD, SUT_SUDO_PASSWORD, and/or SUT_SSH_PASSWORD where password is required.
setup-sut-docker.sh
The setup-sut-docker.sh script creates the host environment for docker execution. The script takes the following arguments:
options are:
- --port: Specify the SSH port number. Default 22.-
--nointelcert: Do not install Intel certificates.
setup-sut-k8s.sh
The setup-sut-k8s.sh script creates the host environment for Kubernetes. The script takes the following arguments:
Usage: [options] <user@controller-ip[:private_ip]> <user@worker1-ip[:private_ip]> [<user>@worker2-ip[:private_ip]> ...]
options are:
- --port: Specify the SSH port number. Default 22.-
--nointelcert: Do not install Intel certificates.-
--no-password: Do not ask for password. Use environment variable DEV_SUDO_PASSWORD, SUT_SUDO_PASSWORD, and/or SUT_SSH_PASSWORD where password is required.-
--worker: Switch to the worker group.
- --client: Switch to the client group.
- --controller: Switch to the controller group.
setup-sut-kvm.sh
The setup-sut-kvm.sh script creates the host environment for the KVM execution. The script takes the following arguments:
where options are:
- --port: Specify the SSH port number. Default 22.
- --hugepage: Specify the hugepage setup as hugepagesz/hugepages, for example, 2M/8192 or 1G/16.
- --reboot: Reboot the SUT after the setup.
- --mtu <value>: Specify the VXLAN MTU value.
- --dev <value>: Specify the VXLAN interface device.
- --vxlan: Setup VXLAN among multiple KVM hosts.
- --reset: Force re-installing KVM and VXLAN.
- --no-password: Do not ask for password. Use environment variable DEV_SUDO_PASSWORD, SUT_SUDO_PASSWORD, and/or SUT_SSH_PASSWORD where password is required.
setup-itep.sh
The [setup-itep.sh][setup-itep.sh] script install all necessary prerequisites for ITEP setup. The script takes the following arguments: